Geschichten eines Kelly Anoraks – Tales of a Closet Case Files Kelly Anorak

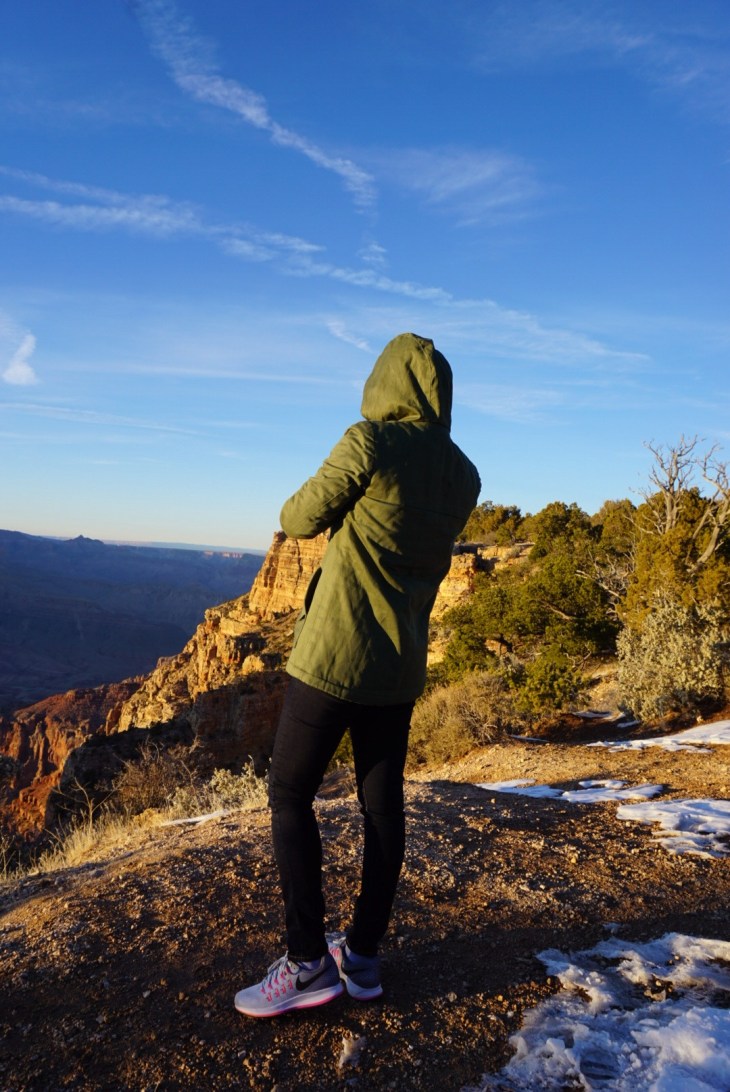
DE: Guten Morgen ihr Lieben und viele Grüße aus ARIZONA!!! Wir haben beschlossen vor der Kälte zu fliehen und sind für 2 Wochen zurück nach Amerika geflogen. Es ist auf jeden Fall wärmer als Deutschland, aber nicht ganz so warm, wie es beim letzten Mal war, als wir hier waren. Wir hatten vor wieder für ein paar Tage in die Wüste zu fahren und letztes Mal habe ich in meinem Pulli unheimlich gefroren und mich selbst geschimpft, dass ich keine ordentlich Übergangsjacke besitze…. Weshalb ich dann noch kurz (8 TAGE!!!!) vor der Abreise den Kelly Anorak von Closet Case Files genäht habe.

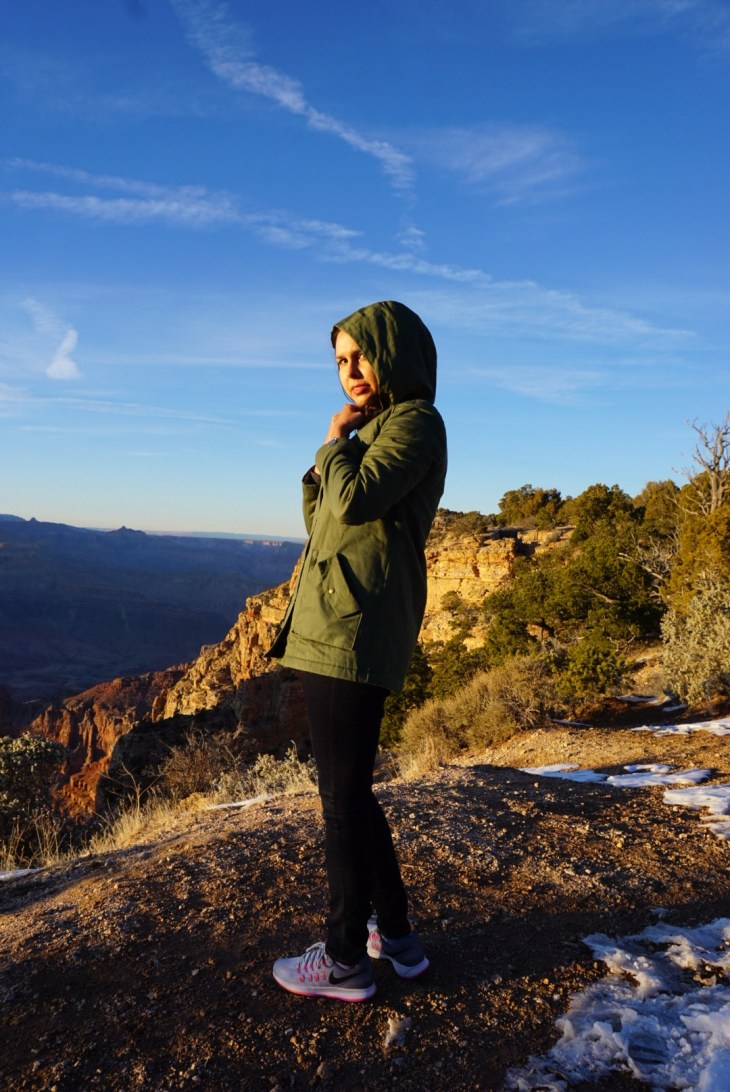
EN: Good morning everyone and greetings from ARIZONA! We’ve decided to escape the cold and have been spending the past 2 weeks in America. It’s most defiantly much warmer that the weather we fled from in Germany, but it’s also quite a bit cooler than the last time we were here. We had planned to spend a few days in the desert und since I was freezing my butt off the last time we were here and was cursing myself for not owning a proper utility jacket, I decided to sew a very last minute one (8 days before we left!!). So without further ado, let me tell you all about my Closet Case Files Kelly Anorak!

DE: Ich habe einige Schnitte von Heather Lou in meinem Lager, habe mich aber bisher irgendwie nie ran getraut…Was mir sehr gut an ihren Schnitten gefällt, ist das sie etwas anspruchsvoller sind und recht “Fashion Forward” sind. Nach meinem Urlaub will ich mich dann endlich an die Ginger Jeans trauen, ich habe außerdem noch schon den Charlie Caftan ausgeschnitten und will für den Sommer auch ein Kalle Dress aus Leinen nähen. Aber kommen wir zurück zum Kelly Anorak, ich hatte den Schnitt gekauft als er vor 2 Jahren (!!!!) auf dem Markt kam, habe alle Materialien für die ungefütterte Jacke gekauft (roter Twill, Schrägband, Druckknöpfe etc) und habe dann auf die ersten Rezensionen gewartet…. Die fielen in genau 2 Kategorien aus… ALLES WAR SUPER…. Oder … ALLES WAR SCHRECKLICH! Mir gefiel auch nicht, dass die Jacke ungefüttert war und als es dann ein Tutorial zum füttern herauskam wurde mir das alles einfach zu kompliziert, weshalb ich dann alles in eine Ecke geworfen habe… wo es dann 2 Jahre verstaubt ist….

EN: I own quite a number of Heather Lou’s patterns, but have yet to actually sew up any of them, I’m honestly not quite sure what my deal is…. I really like the fact that the patterns are very fashion forward and cater to the more advanced seamstress, which is why I will have to get my act together and make up a Charlie Caftan and a Kalle Dress when I get back home. As for Kelly, I bought the pattern when it came out about 2 years ago (!!!) and then swiftly sourced all the materials, red twill, bias binding, snaps etc and then I waited for the first reviews of the Jacket which fell into two categories: EVERYTHING WAS PERFECT or EVERYTHING WAS TERRIBLE. I was kind or irritated, that the jacket was unlined and after reading the interlined Jacket hack… I was left very confused and decided to scrap my plans and toss Kelly and all the materials into a corner, where it spend all this time collecting dust.

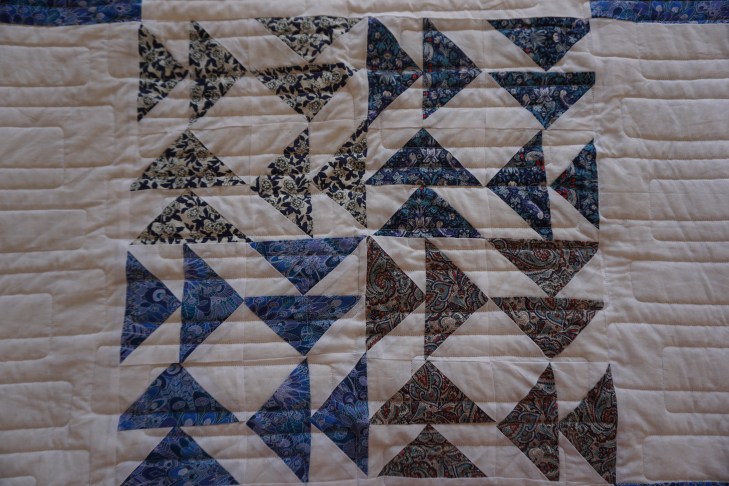
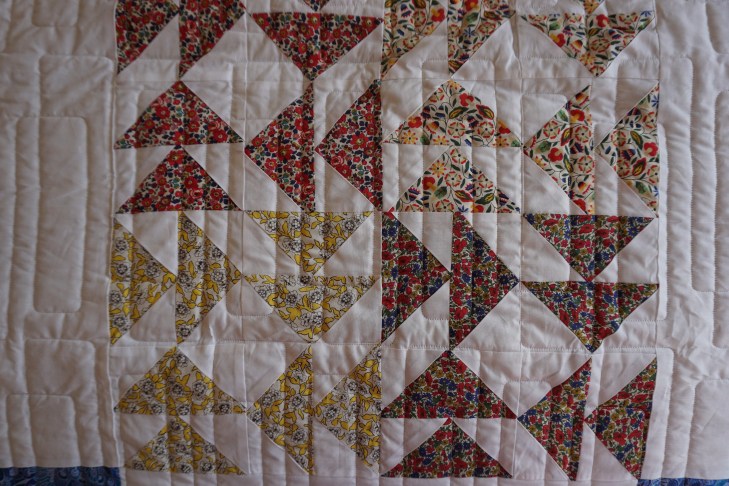
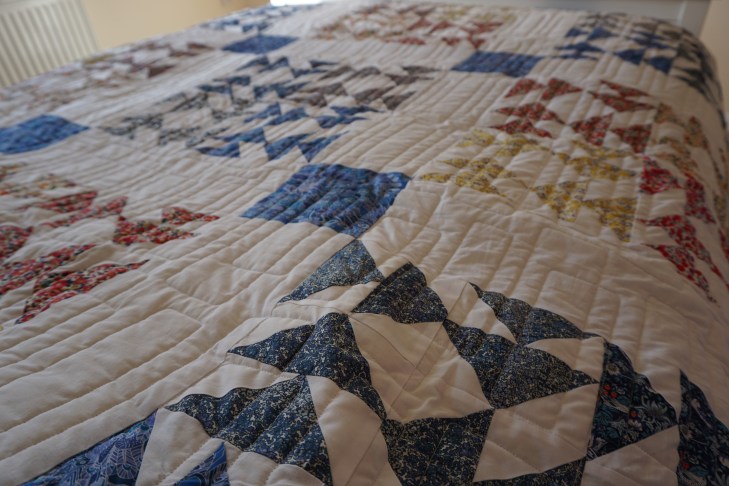
DE: Kommen wir diesjährigen Februar, mir war klar, dass ich einen Anorak brauchen würde also habe ich die Kelly heraus gekramt, mittlerweile gab es auch ein zusätzliches “Futter Paket” bei Closet Case Files, welches ich gekauft habe und an den Copy Shop meines Vertrauens zum drucken geschickt habe und dann habe ich mich endlich getraut, die Jacke zu nähen. Ich habe letztes Jahr am Black Friday, bei Blackbird Fabrics diesen Olivfarbenen Twill gekauft (den habe ich auch in Tabacco gekauft… weiß aber nicht was ich damit nähen soll), weshalb der rote Twill immer noch in meinem Lager liegt. Ich habe Anfang Februar, als ich in Birmingham war, beim “Liberty Man” 2 Meter Tana Lawn gekauft, was ich zum füttern der Jacke verwendet wollte. Zunächst habe ich beim Tedi 2 weiße Fleecedecken für ganze 4 € gekauft und dann die Futterteile dann in Liberty und Fleece ausgeschnitten. Ich habe dann den Liberty Stoff an die Fleecedecke gequiltet, ich habe einfach diagonale Linien (die jeweils 2 Inch parallel zueinander gelaufen sind) mit einem Frixion Stift (der verschwindet, wenn man über ihn bügelt!) und meinem Quiltlineal auf die einzelnen Stücke gezeichnet und anschließend alles festgesteppt.

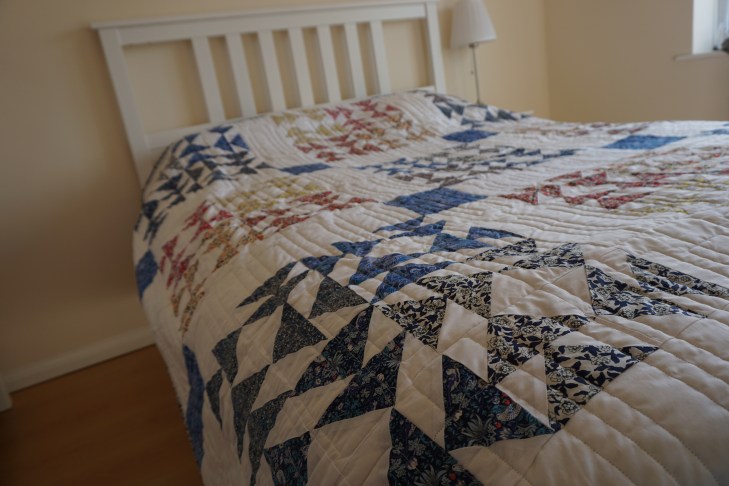
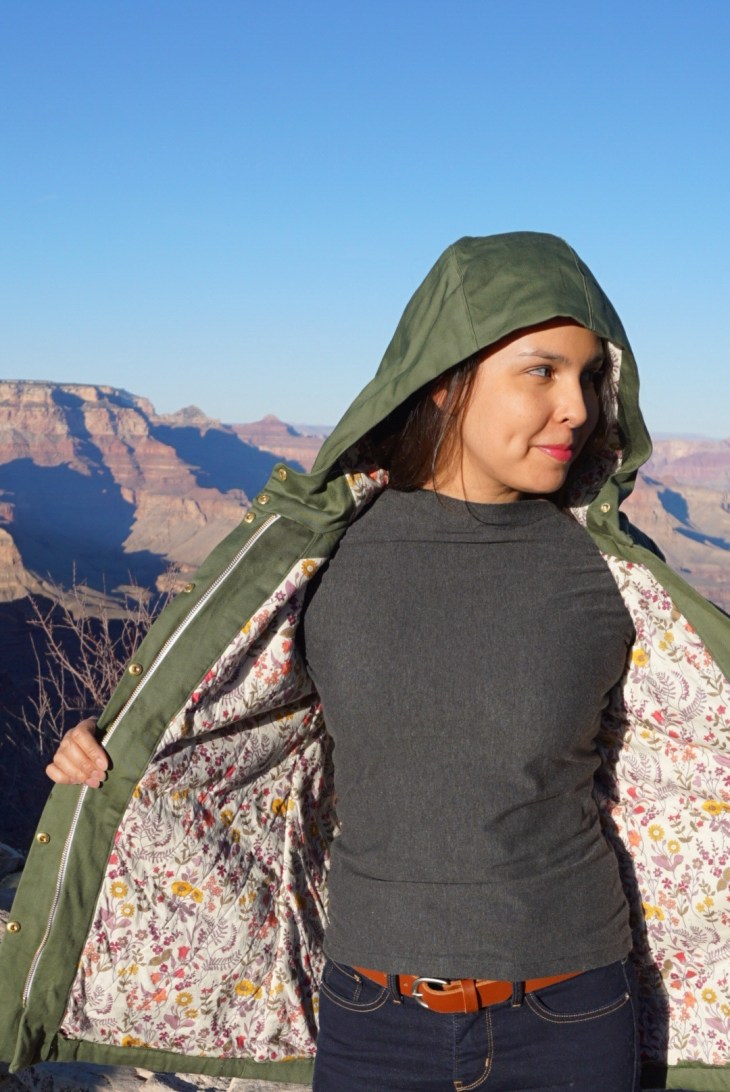
EN: Which brings us to this February, and my desperate need for a proper utility Jacket. Closet Case Files had released a lining pack for the Jacket, that I purchased and sent off to the copy shop and I decided it was time to bite the bullet and sew myself an Anorak! During last year’s Black Friday Sales, I bought myself some olive twill (I also got  some of the tobacco colored one, but I have no idea what to make with it) at Blackbird Fabrics and while I was in Birmingham at the beginning of February, I made a pit stop at the “Liberty Man” at the Rag Market and bought myself 2 meters of Tana Lawn that I wanted to use as lining. The first thing I did was buy 2 fleece blankets at the 1€ shop, I cut out the lining pieces using both the blankets and the Tana Lawn. I then proceeded to quilt the blankets to the Tana Lawn by drawing diagonal lines (2 inches apart) using a Frixion pen (it comes out when you iron over it!) and then quilted everything together. Once I had done that with all the quilting pieces, I assembled the lining Jacked per the instructions.

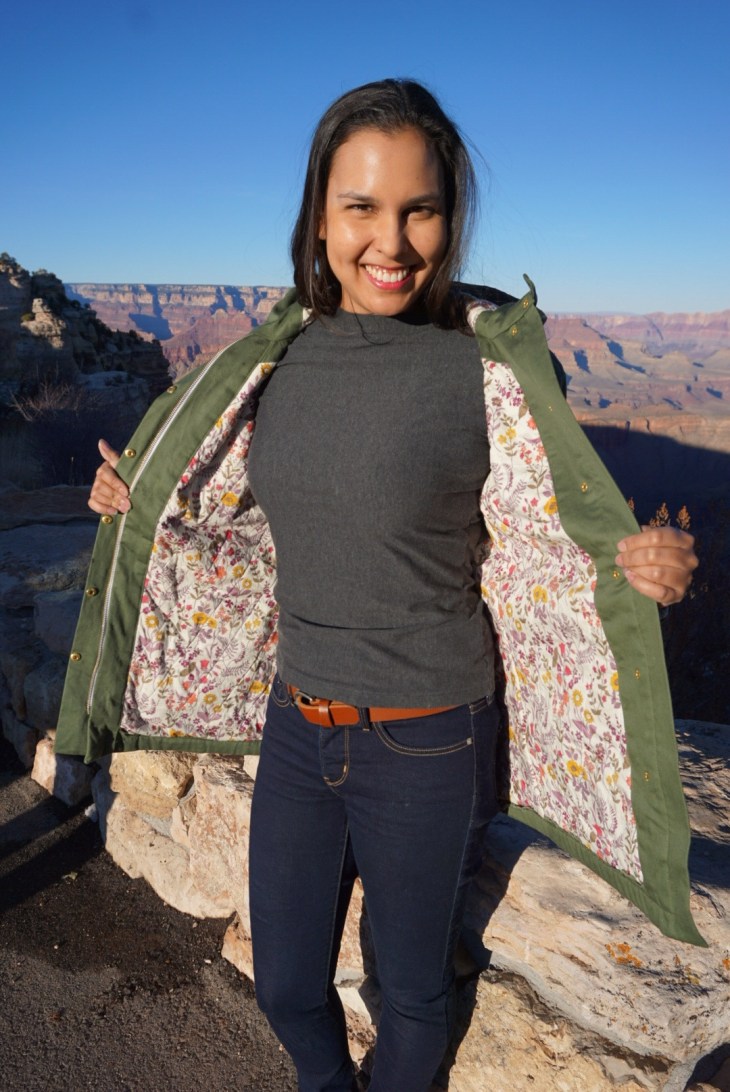
DE: Anschließend habe ich alle Futterteile nach der Anleitung zusammen genäht und fertig war die Futterjacke! Die Konstruktion für die eigentlich Jacke war ziemlich einfach, bei den Taschen hab ich die Fotoanleitung von Heather Lou verwendet. Closet Case Files, hat eine überarbeitet Fotoanleitung für alle wichtigen und komplizierten Schritte für die gefütterte und ungefüttertet Kelly letztes Jahr online gestellt , was das Nachvollziehen vieler komplizierteren Schritte deutlich einfacher macht. Ich habe mich beim annähen der Kapuze unheimlich schwer getan, und habe alles bestimmt 10 Mal aufgetrennt und wieder zusammengenäht, auch habe ich bei der Konstruktion der Überdeckung für den Reißverschluss schwer getan und habe ständige die gleichen Teil falsch zusammen genäht… das kann aber auch daran gelegen haben, dass ich dann schon recht müde war.

En: Putting the shell together was quite simple, Closet Case Files had uploaded a new improved Photo Sew Along on their site, depicting all the difficult steps for both the lined and unlined Kelly Anorak. I used the tutorials to put the pockets together, as I was struggling with the written instructions. I also struggled attaching the hood to the jacket, and must have unpicked the pieces about 10 times. I also kept sewing the plackets together  incorrectly, which probably had more to do with the fact that I was beginning to get really tired and kept confusing the pieces.

DE: Für die Knöpfe habe ich goldene Anorak Knöpfe von Prym verwendet, ich habe dazu meine heißgeliebte Prym Zange verwendet, ohne die ich keine Druckknöpfe mehr anbringen würde (KAUFT DIESE ZANGE!!!). Den Reißverschluss (60 cm) habe ich vom Stoff und Still und war anfangs davon überzeugt, dass er etwas zu kurz ist, jetzt finde ich, dass er die perfekte Länge hat. Die Ärmel der Jacke haben die perfekte Länge, ich war auch wirklich begeistert, dass es beim säumen der Jacke keine Schwierigkeiten gab (ein Teil ist sonst immer etwas zu lang oder wölbt sich sonst bei mir…. HEUL). Es gab noch ein zusätzlich Tunnelzug für die Jacke die ich weggelassen habe, ich hatte erstens keine farblich passende Kordel und zweitens hatte ich keine Bock mehr… LOL!

DE: I used gold Prym anorak snaps and attached them using my beloved Prym pliers, seriously, if you are about to attach snaps, do yourself the favor and get these pliers, they are a real game changer! I used a 60 cm zip from Stoff an Stil, I was seriously worried, that it wouldn’t be long enough, but as it turns out, it’s just right! The sleeves have the perfect length and I enjoyed hemming the anorak, all the pieces fit together perfectly, there was no “one side is longer than the other” or any other craziness. I left off the drawstring, mostly because I didn’t have a cord that matched the jacket… and I also really wanted to be done with the jacket… LOL!!!

DE: Ich bin sehr zufrieden mit meinen neuem Anorak, er ist deutlich besser geworden, als ich gedacht habe und ich bin froh dass ich mir die Mühe gemacht habe die Jacke mit der Fleecedecke zu füttern, damit habe ich bisher auch keine Minute gefroren! Solltest du dich also bisher auch vor der Kelly gedrückt haben, kann ich nur sagen: TRAUE DICH!! Die Fotoanleitung ist wirklich Goldwert, wenn du mit der Papieranleitung nicht weiterkommst. Ich denke, ich werde im Herbst noch einmal den roten Twill heraus kramen und noch eine Kelly nähen, schließlich brauche ich mehr als einen Anorak in meinem Kleiderschrank! Weitere gut gekleidete Damen findet ihr heute auch auf RUMS.

EN: I’m really pleased with how my Kelly Anorak turned out and I am so glad that I took the time to properly line it (with that fleece blanket LOL!). So far I haven’t been cold while wearing it and it really is a garment I have been missing in my closet. For all of you contemplating making this jacket: DO IT! The sew along will hold your hand through all the tricky bits and trust me having a nice utility jacket is something you’ll wish you’d gotten eons ago. I’m pretty sure, that I will be digging out that red twill in autumn and will be making up another Kelly, because I defiantly need more than one Anorak in my closet!

Geschichten eines Hochzeitgäste Kleides – Tales of a Wedding Guest Dress

DE: Guten Morgen ihr Lieben! Heute möchte ich euch das Kleid zeigen, dass ich zur Hochzeit meiner lieben Freundin Julia, getragen habe. Wie ich euch schon letzte Woche berichtet hatte, habe ich mich unheimlich in den Sophia Schnitt von By Hand London Verliebt und habe schon 2 Kleider im Sommer genäht.

Für diesen Anlass, beschloss ich den Rock des Kleides abzuändern. Es ist zwar ein weiter Rock im Schnitt mit einbegriffen, aber die vielen Godetes machten mir große Kopfschmerzen, also beschloss ich stattdessen den Rock von dem Rosie Dress von Sew Over It zu verwenden, was unheimlich gut gelang.

EN: Good morning everyone! Today, I’d like to show you the dress I made for my dear friend Julia wedding. As I have been having a bit of a love affair with the Sophia Dress by By Hand London, I decided to use the bodice of that dress and pair it with a different Skirt. Granted, The Sophia does come with a big skirt pattern piece, however I couldn’t wrap my head around the many godetes, so I decided to use the Rosie Dress Skirt from Sew Over It, instead.


DE: Für den Stoff verwendete ich Seidenkrepp von Liberty of London, den Stoff hatte ich mal Anfang des Jahres bei Shaukat bestellt, und schon in blau zu einem Eve Dress vernäht. Die Seide ist sehr angenehm zu verarbeiten, sie lässt sich super bügeln, machte mir beim Ausschneiden keine Probleme und auch beim vernähen lief alles wie geschmiert. Ich habe eine 70ger Nähmaschinen Nadel verwendet und Viskose Nähseide von Gütermann, um möglichen Kräuselungen entgegen zu wirken und habe beim Bügeln ein Bügeltuch benutzt damit die Seide nicht beschädigt wird.

EN: I chose to use a crepe de chine from Liberty of London, that I had ordered at the beginning of the year from Shaukat. I actually used a different colour way for the first Eve Dress, I sewed. I really enjoyed sewing with the silk , it pressed beautifully, didn’t give me a headache while I was cutting out the pattern pieces and my machine didn’t even try to eat the fabric! I used a 70  sewing needle and Viscose thread from Gütermann to avoid the fabric from looking tortured, It was worth the effort!


DE: Ich habe das Oberteil des Kleides mit der gleichen Seide gefüttert und habe alle Säume mit der Overlock versäubert (weil ich mal wieder akute Zeitknappheit hatte.. Asche auf mein Haupt!) den Rock habe ich jedoch mit der Hand vernäht (das hat ewig gedauert!!!) und dabei angefangen Hause of Cards zu gucken. Ich glaube ich bin der letzte Mensch auf diesem Planeten, der erst jetzt damit angefangen hat diese Serie zu gucken!!! Ich bin total süchtig und kann nicht warten die restlichen Staffeln zu verschlingen.

EN: I chose to line the bodice of the dress with the same fabric and used an overlocker for all the seams ( because I was last minute dot com, per usual!) I did take my time to hem the skirt by hand (which took forever!!) while watching House of Cards. Seriously, I must be the last person on the planet that has discovered this series, I am addicted and I cannot wait to see what Frank and Claire get up to next!! I plan to bingewatch the next 4 seasons the coming weeks!!!


DE: Zu dem Kleid habe ich meine beigen Schuhe und meinen Fascinator getragen, es war am Tag der Hochzeit so kalt, dass ich sogar noch meine Übergangsjacke aus dem Schrank kramen musste. Das ist übrigens der Silvia Coatigan von Schnittchen in Rosa Wolle, den ich vor 2 Jahren genäht habe, ich habe mich unheimlich darüber gefreut, dass die Jacke so gut zum Kleid gepasst hat. Die Hochzeit war übrigens einfach nur schön und ich bin froh, dass ich dabei sein durfte!

Weitere gut gekleideten Damen findet it heute unter MeMadeMittwoch Continue reading “Geschichten eines Hochzeitgäste Kleides – Tales of a Wedding Guest Dress”

Geschichten über Sophia – Tales of By Hand London’s Sophia Dress

DE:  Meine heutigen Kleider widme ich der wunderbaren Nina von Kleidermanie deren Blog ich schon seit Jahren lese und dessen Garderobe ich am liebsten klauen würde. Nina hat in diesen Post von ihrer Urlaubsgarderobe für Paris gebloggt und dann auf IG ihr Sophia Kleid von By Hand London gezeigt. Ich war hin und weg von dem Kleid und überlegte wo ich nun auf die schnelle diesen Schnitt auftreiben könnte…. und stieß daraufhin auf den Schnitt IN MEINEM LAGER!!!!!! Ja, so ist es liebe Leser und Leserinnen, ich besitze scheinbar viel zu viele Schnitte die ich noch nie umgesetzt habe und dann Originalverpackt in irgendeiner Ecke vergessen habe. Nachdem ich mich eine Weile abgrundtief geschämt hatte, habe ich mich dann an die Arbeit gemacht, meine Schnitte auszusortieren und sie ordentlich nach Schnittmuster-Label abzulegen. Ich habe mich auch von vielen beim Sewing Weekender in Cambridge getrennt (hust…hust…Collette..hust..hust…) um nur noch die Schnitte im Lager zu haben, die ich tatsächlich nähen möchte. So viel zum Stand meines Schnittmuster Lagers, kommen wir zu Sophia!

EN: I’d like to dedicate my two Sophia dresses to Nina from Kleidermanie I’ve followed her blog for many years and love all the beautiful garments she sews. Right before we all broke up for summer, Nina posted about the clothes she’s like to take on her trip to Paris and also posted about her Sophia dress, needless to say I was totally in love with her dress and decided I needed this pattern stat! I started trying to track down the paper pattern online… only to find a copy of it in my stash… OOPS!!! Right, I felt a bit silly, that couldn’t remember the patterns I own and did a proper clear out of all the things I no longer wanted and donated them at the Sewing Weekender…. (cough..cough..Collette..cough…cough…)  Anyway, let’s get back to Sophia!
DE: By Hand London hat das Sophia Schnittmuster schon vor einigen Jahren auf den Markt gebracht, das Oberteil hat einen ganz ungewöhnlichen Ausschnitt in Verbindung mit den Trägern und sehr viele Abnäher, was einen aber nicht abschrecken sollte. Es gibt auch zwei sehr Unterschiedliche Rock varianten, was den Schnitt dann auch vielseitiger macht! Den Mint farbenen Stoff den ich verwendet habe ist von Atelier Brunette, die hatten am Sommer Anfang einen Ausverkauf  und da habe ich mich etwas ausgetobt, ich besitze noch gar nichts mint farbenes in meinem Kleiderschrank, weshalb ich mich dann für diesen Stoff entschieden habe. Den Blauen Bonbon Stoff ist von Liberty und den habe ich in London bei Classic Textiles gekauft. Ich habe mich bei beiden Kleidern  für Version 1 mit dem Bleistift Rock entschieden und die Größe 12 gewählt. An dem Schnitt habe ich  nur die Träger um 1 inch verkürzt, was die Passform 100% verbessert hat, das musste ich übrigens auch bei Orsola machen.

EN: By Hand London released this pattern a number of years ago and what initially attracted me to the dress was the unusual bodice. The darts start in the middle of the bodice instead of on the sides, the straps have a V-shape and the pattern comes with two very different skirts, which makes it very versatile. I chose to make Version 1 with the pencil skirt and used a mint colour lawn from Atelier Brunette, that I picked up at their online summer sale and the sweetie dress, as I dubbed it on IG is actually a liberty fabric I picked up at Classic Textiles in London at the beginning of the year. I cut a straight size 12 and the only alteration I made was shortening the strap by 1 inch. Yep, the fit was really good, right out of the package.

DE: Ich habe das Oberteil mit dem gleichen Stoffen gefüttert, da ich nicht wollte, dass mir möglicherweise ein anderer Stoff bei den Trägern herausquillt.  Ich habe am Rückenteil etwas mit dem einnähen des unsichtbaren Reißverschlusses und den Abnähern gekämpft. Ich wollte dass sich alle Abnäher direkt in der Mitte treffen, dass hat viel Geduld gekostet, aber das Ergebnis kann sich jetzt zeigen lassen. den Saum hab ich mal wieder mit der Hand genäht und dabei THE DEFENDERS of Netflix geschaut. Diejenigen die Jessica Jones und Luke Cage gut fanden, werden diese Serie lieben. Ich bin traurig, dass es nur 8 Folgen gab, die waren viel zu schnell vorbei.. heul….

EN: I self lined the bodices , because I didn’t want the lining fabric to roll out and look like the dogs dinner (I did understitch, but you know how it is….) I also used invisible zips on both dresses, as there are quite a few darts on the back that meet up in the middle, I did have to use my seamripper a number of times, what can I say, I’m a perfectionist (cough cough…masochist..cough ..cough..) and it was worth getting the dart to match up perfectly! I hand sewed the hem while watching THE DEFENDERS on Netflix, those of you who loved Jessica Jones and Luke Cage will love this series, I was just really sad that the fun was over after 8 episodes…. sob!

DE:  Ich muss jedoch zugeben, dass der Mintfarbene Stoff SEHR knittert, ich habe nun ein Waschmittel mit Stärke gekauft um den Knittern den Kampf anzusagen! Mal gucken ob das wirkt! Ich habe schon eine dritte Version dieses Kleides genäht und zwar als Hochzeitsgästekleid,  mit einem anderem Rock, das stelle ich euch dann nächste Woche vor. Mir gefällt das Muster sehr gut und ich hab schon Ideen das Oberteil mit anderen Röcken von anderen Muster zu kombinieren, mal gucken wie lange der Sommer noch bei uns bleibt!

Weitere gut gekleidete Damen findet ihr heute unter MeMadeMittwoch!


EN: Unfortunately, the mint fabric does wrinkle quite a bit, I’ve bought a detergent that starches the fabric while washing it and I hope that will sort out the issue, as I really love the dress. I’ve already sewn a bit of a hack of this dress, using the bodice and swapping out the skirt, as a wedding guest dress, which I’ll blog about next week!  I really, really love this pattern and have plans to hack this dress a few more times, if the weather allows it!

Frühling? Der Sommer kann kommen – Sewoverit Eve Dress

img_4167

DE: Vor einigen Jahren hat Lisa Comfort ein Bild von Ihrem Muster Eve Dress auf dem Sewoverit IG Account hochgeladen, ich war sofort Feuer und Flamme. Das einzige Problem an der Sache, das Muster konnte man leider nicht kaufen, sondern musste den dazugehörigen Workshop besuchen, damals habe ich noch in Bayern gelebt und als ich dann nach Birmingham gezogen bin, war ich immer noch zu weit von den beiden Sewoverit Geschäften entfernt…. seufz… ABER DANN! Kurz vor Weihnachten gab Lisa auf ihrem wöchentlichem Vlog bekannt, welche Schnitte dieses Jahr in Druck gegeben werden würden und siehe da, Eve war ganz vorne mit dabei! YIPPIE!!!!

EN: A number of years ago the wonderful Lisa Comfort of Sewoverit uploaded the Eve Dress on the Sewoverit IG account. I fell head over heals the moment I saw the dress and then was completely distraught, when I found out she was only (at that time) going to be a class you could take in one of their London shops…. and just when I thought all was lost, Lisa announced in her Xmas Vlog, that Eve would be one of the dresses, Sewoverit would release in 2017. *insert me doing a victory dance here!*

1ddb290e-ec40-4807-b5cc-6fe464645c44

DE: Ich hatte das große Glück, dass mich Sewoverit anschrieb und mich zur ihrer Schnittmuster Launch Party in London eingeladen hatte, ich hatte jedoch leider mit der zweiten Nebenhöhlenentzündung in 6 Monaten zu kämpfen und konnte daher nicht zur Party BOOOO!!!!!!!!!!!!! Als es mir dann endlich wieder etwas besser ging, habe ich mich dann an den Schnitt gemacht, und dieses Kleid genäht.

EN: I was very lucky, that Sewoverit contacted me, the week before the pattern was released and invited me to their launch party, *insert me doing the victory dance on top of a table here*  And then 3 days before the party, I caught the mother of all colds/sinus infections… I thought I was dying… I KID YOU NOT!!!! I was absolutely gutted, that I couldn’t make the party, but once I started feeling a bit better, I decided to sew up the dress.

img_4174

DE: Für den Stoff habe ich eine Krepp-Seide von Liberty verwendet, die ich letztes Jahr von Shaukat bestellt habe.  Den Stoff habe ich in einer anderen Farbvariante gekauft und werde ihn so lange horten, bis ich das richtige Muster dafür gefunden habe. Ich habe mich für Variante 2 entschieden, also den Geraden Rock, denn ich mittlerweile kein Fan mehr von den Vokuhila Röcken bin. Die Anleitung war sehr gut beschrieben und alle Schnittmusterstücke haben auch zusammengepasst. Ich habe jedoch den Fehler gemacht und nicht auf die Anleitung geachtet und kein Stabilisierung-tape an dem Ausschnitt angebracht, ich hatte keins daheim und dachte, ich nähe einfach innerhalb der Nahtzugabe eine Linie, das passt schon.. FALSCH GEDACHT!!!! Das Oberteil leierte ganz schnell aus und ich war untröstlich, zum Glück haben mir sehr viele Leute und Sewoverit nach meinem IG SOS Aufruf ganz tolle Tipps gegeben. Ich hab also mit meinem Dampfbügeleisen, den Ausschnitt dazu animiert sich wieder zusammen zuziehen und habe dann mit frisch aufgetriebenen Stabilisierungsband (Großes Dankeschön an meine liebe Freundin Vee!!!), genau das gemacht, was ich von Anfang an hätte tun sollen! Ich habe alle(!!!) Säume mit der Hand genäht, sogar die von den Ärmeln und habe wieder auf Viskose -Faden von Gütermann zurückgegriffen, das hat zwar ewig gedauert, sieht aber verdammt gut aus!

EN: I chose a Silk Liberty fabric, that I got from Shaukat last year (I also bought it in another colorway, but I have yet to decide what to make up with it) and chose to make up view 2 with the straight skirt as I am starting to fall out of love with the high-low hem. The instructions were great as usual and all the notches of the pattern matched up as well, which made construction a total breeze. However, I made the terrible mistake of not listening to the instructions, when they tell you to stabilize the neckline with stay-tape…. I didn’t have any stay-tape, so I just stay-stitched the neckline and then hand stitched everything down… and…. IT BAGGED OUT LIKE CRAZY!!!! WHY????? I put out an SOS on IG and sooo many lovely ladies including Sewoverit got in touch with me and told me how I could fix my boo-boo. I used lots of steam, and my dear friend Victoria (shout-out to you, Vee!) hooked me up with proper stay-tape!!! Disaster averted!! I hand stitched all the hems, including those on the sleeves using rayon thread from Guetermann, definitely worth the effort!

img_4171.jpg

DE: Zum Kleid selber, ich liebe diesen Schnitt, die Ärmel sind wunderschön verspielt, der Rock fällt sehr schön und ich musste, außer dem Drama mit dem Stabilisierungsband, woran ich selber Schuld bin, nichts an dem Kleid verändern. Ich empfehle sehr drapierende Stoffe wie Seide oder Viskose für dieses Kleid zu verwenden, alles andere wäre dafür einfach zu steif. Ich möchte gerne die Version mit den 3/4 Ärmel für den Herbst nähen, vielleicht in einem Krepp in dunklen Farben? Ich glaube das würde super in meine Arbeitsgarderobe passen.

Andere fesch gekleideten Damen findet ihr übrigens hier unter MeMadeMittwoch.

EN: All I can say, is that I adore this dress, I love the sleeves and the way it drapes and next time, I will absolutely do as I am told and not try to wing it!!! I do recommend using very drapey fabric such a silk or viscose for this pattern, anything else would not make it drape as nicely. Also I see, many more Eves in my future, even a long sleeved one, maybe in dark jewel tones for Autumn/Winter? I think they would work really well in my work wardrobe.

For more fabulously dress ladies check MeMadeMittwoch here.

img_4166


Patiently waiting for spring – Holly blouse, Tulip skirt and Luzerne coat

img_3460.jpg

EN:I think it’s safe to say, that we are all waiting for spring to finally arrive and to start wearing clothes with colors!

When Sewoverit released their Tulip Skirt last year, I was on it like white on rice, I printed it off, chose the fabric and then promptly forgot to make it up. THE HORROR!! I still had a meter of blush twill left over from my first Luzerne coat and thought it would make a great Spring wardrobe staple. I WAS RIGHT!

I think it took me exactly 2 hours to cut and sew this skirt, which also included hand sewing the hem, for a nicer finish. I cut a straight size 12 and added 1.5 inches for length. So far, I’ve always had really great experiences with Sewoverit. All the notches matched up and the instructions are clear and easy to understand. I didn’t have enough fabric to sew the waistband in one, so there is a seam in the middle, at first this really annoyed me, but I have since decided it’s a cool design feature. SORTED!! I used an invisible zipper that went in without a hitch ( is it me, or do these kinds of zips go in perfectly the first time or you have to unpick it 30 times? yes, no??? Let me know!!)

EASY PEASY LEMON SQUEEZY!


img_3513.jpg

DE: Ich weiss nicht wie es euch geht, aber meiner Meinung nach, kann nun endlich der Frühling kommen!

Als Sewoverit ihr letztes Jahr ihren Tulip Skirt veröffentlicht hatten, war ich ganz hin und weg, ich habe den Schnitt sofort ausgedruckt, einen Stoff aus meinem Lager gewählt nur um anschlissend meinen ganzen Plan zu vergessen. UPS!! Ich hatte noch einen Meter von meinem rosa Twill übrig, ein Reststück von meinen ersten LuzerneMantel und dachte es wuerde sich recht gut dazu eignen, meinen Kleiderschrank Fruehlings tauglich zu machen.


Ich glaube, es dauerte genau 2 Stunden den Rock auszuschneiden und anschliessend zu nähen, den Saum nähte ich mit der Hand, da ich finde, dass der Rock so etwas schöner aussieht. Ich habe die Größe 12 gewählt und 1,5 Zoll Länge hinzugefügt, da der Rock mir wohl zu kurz geworden wäre.  Bisher hatte ich immer gute Erfahrungen mit Sewoverit, die Anweisungen sind klar und leicht verständlich und ich denke der Schnitt wäre auch für Anfänger sehr einfach zu bewähltigen. Ich hatte nicht genug Stoff um den Bund aus einem Stück zu nähen, weshalb ich nun genau in der Mitte einen Saum habe. Zuerst ärgerte mich das ungemein darüber, mittlerweile habe ich mich damit abgefunden und finde, es könnte glatt zum Design dazu gehören. (Ich glaube das rede ich mir immer noch ein…)  Ich habe einen verdeckten Reißverschluss verwendet, der gleich beim ersten Mal problemlos eingenäht werden konnte (ist das nur bei mir so, dass bei dieser Art von Reißverschlüssen das einnähen entweder beim ersten Mal perfekt funktioniert oder man musst es 30mal aufzutrennen? Ja, Nein??? Lasst es mich wissen!!)

EASY PEASY LEMON SQUEEZY!

img_3511.jpg

EN: So the Holly Blouse! This is the first time I’ve ever used a Style Arc pattern, I’ve been admiring their vast range of ready to wear patterns, that are all so on trend and finally pulled the trigger and  I ordered a pattern off Amazon, so I’d have it by the next day, which I think is just brilliant! My love for bow blouses is well documented on my IG account, but I decided to branch out and try a new pattern.

I chose a very nice white silk crepe and cut out all the pieces with a rotary cutter, which worked out really well. I cut out a size 10 and didn’t change a single thing. The construction is quite simple if you’ve sewn a few blouses before, the instructions are  limited, but they do give you a few pointers which is helpful. The other thing that you might want to take into consideration, is that the seam allowance is only 1 cm, I personally thought that was more than enough to make French seams with it, because PRETTY INSIDES!!

I used a very light weight interfacing for the cuffs and the facings and sewed with Rayon thread from Gütermann. I read somewhere that cotton thread can be a bit to heavy for silk fabric and might make the seams look a bit puckered. I actually bought a whole bunch of this stuff at the last Hobbycraft sale where all the Gütermann thread was going for half the price!!!!

img_3506.jpg

DE: Zu der Bluse, ich habe bisher noch nie ein Muster von Style Arc verwendet, habe aber  schon sehr lange ihre Vielzahl von modernen Schnitte bewundert und als  ich dann mit dem Rock fertig war, dachte ich, “Jetzt brauchst du dazu auch eine neue Bluse!” Bisher habe ich immer den Blusen Schnitt von Sewoverit verwendet (mit Sicherheit 7 Mal, Bilder dazu findet ihr auf meine IG account) aber ich dachte, ich probier mal etwas neues aus. Style Arc Papierschnitte kann man übrigens über Amazon bestellen, was sehr praktisch ist, vorallem, wenn sie am nächsten Tag im Briefkasten sind! YAS!!!!

Der Blusen Schnitt heist Holly, ich habe weisse Seide verwendet und alles mit meinem Rotary Cutter (was ist hierfür bitte das richtige Deutsche Wort?? Laut Leo ist das Rollfräse…) ausgeschnitten, was deutlich schmerzfreier war, als alles mit meiner Schere aus zuschneiden! Ich habe die Groesse 10 ausgeschnitten und absolut nichts am Schnitt verändert. Genäht habe ich alles mit einem Rayon Faden von Gütermann, da ich einmal gelesen habe, dass Baumwollfaden zu schwer fuer Seide sei und man dann hässliche Kräuselungen bei der Naht bekommt, dies wollte ich auf jeden Fall verhindern. Das hat übrigens echt super funktioniert und die Bluse war in wenigen Stunden fertig gestellt.

img_3504.jpg

EN:  As no spring outfit is complete without a proper coat, in the UK, I made another Deer and Doe Luzerne trench coat. For this version I used a cotton canvas from Barry’s in Birmingham, as the fabric was a bit see through, I opted to interline it was an interfacing meant for wool coats. The interlining made the fabric drape really nicely and it also made it opaque, WIN-WIN. I cut a straight size 40 and lengthened the skirt by 2 inch, I also used some vintage glass buttons from my stash that kind of blend into my coat, which isn’t a bad thing per say…

I made bias binding out of left over Liberty I had in my stash, however.. IT DOESN’T GO WITH MY COAT AT ALL… AT ALL!!!! WHAT WAS I THINKING?? Anyway, I’ve decided nobody but I will see it, so there’s that. Construction wise this took a lot less time to make up the second time round. My bound button holes look sooooo much neater, I finished watching Emerald City on catch-up TV and had a brand new coat. =D

I love it so very much, and must now sewing many new outfit that go with it, so I can wear it out! #nevernotsewing

So this is my way of reigning in Spring, I want all the pastel colors and the fun outfits.

Also, have a look at all the other fabulous spring outfits on today’s MeMadeMittwoch!

img_3503.jpg

DE: Da im  Vereinigten Königreich, kein Frühlingsoutfit  ohne einen richtigen Mantel komplett ist, habe ich einen weiteren Deer and Doe Luzerne Trenchcoat genäht. Für diese Version, habe ich einen BaumwollCanvas von Barry’s in Birmingham verwendet, da der Stoff ein bisschen durchsichtig war, entschied ich mich für eine Vlieseline die eigentlich für Wollmäntel gedacht ist. Die Einlage hat den Stoff wirklich schön drapieren lassen und machte es auch weniger durchsichtig, WIN-WIN. Ich habe wieder die Grösse 40 genäht, den Rock um 2 Zoll verlängert und vintage Glass Knöpfe aus meinem Lager verwendet.

Ich habe Schrägband aus Liberty Resten, die ich in meinem Lager hatte, gefertigt… NUR, PASST ES ÜBERHAUPT NICHT ZU MEINEM MANTEL ÜBERHAUPT NICHT!!! WAS HABE ICH MIR NUR DABEI GEDACHT?? Jedenfalls habe ich mich entschlossen, dass niemand, ausser mir das sehen wird, also basta!

Was die Konstruktion des Mantels angeht, dauerte es diesmal deutlich viel weniger Zeit alles zu nähen. Meine Knopflöcher sehen so viel ordentlicher aus, ich habe die letzten paar Folgen Emerald City im Catch-Up TV geschaut und hatte plötzlich einen neuen Trench!

Ich liebe meinen neuen Mantel  so sehr und nun muss ich lauter Outfits passend dazu nähen, damit ich ihn auch regelmässig tragen kann! #nevernotsewing

Viele weitere Fruehlingsoutfits koennt ihr heute beim MeMadeMittowch bestaunen.


My Deer and Doe Luzerne Trench Coat

d6af7171-b21e-4004-9a91-4ddc622086f1.jpg

EN: A few weeks ago I was walking around the top floor of the Bullring in Birmingham, when I came across the most amazing blush lace trench coat by Burberry, needless to say it was way out of my budget, but I couldn’t stop thinking about it. I was in dire need of a new trench coat, my old one is 8 years old and way too small… so I started looking at different patterns from Burda to McCall’s to Vogue to the Robson Coat, but none of them really appealed to me. I think one of the reasons was, that thy all looked a bit too classic (and some looked a bit dated, to be honest…) Then Deer and Doe and wonderfully chic French sewing label released their new spring collection, and would you believe it, they had a cute, modern trench coat that ticked all the boxes for me. It had a fuller skirt, bound button holes and was finished with bias binding. You can guess how long it took me to press order!

DE: Vor einigen Wochen habe ich einem Kaufhaus in Birmingham den allerschoensten Rosa farbenen Spitzen Trench Coat von Burberry entdeckt. Es war Liebe auf den ersten Blick, aber mein Geldbeutel machte mir da ganz klar einen Strich durch die Rechnung. Ich habe noch Tage spaeter an diesen Trench gedacht und beschlossen mir selber einen zu naehen, mein alter Trench war schon fast 8 Jahre alt und mir viel zu eng. Es begann die Suche nach dem passenden Schnitt, ich schaute mir Muster von Burda, McCalls und Vogue and geliebaeugelte den Robson Coat, aber DER RICHTIGE war irgendwie nicht dabei. Ich vermute, viele der Schnitte waren mir ein wenig zu klassisch und zum Teil auch etwas altbacken. =/ ABER DANN! Deer und Doe, dieses fantastisch, schicke Franzoesische Schnittmusterlabel bracht 3 neue Muster, Anfang letzter Woche auf den Markt und deren Trench Coat der Luzerne, war genau dass, was ich gesucht hatte. Mir gefiel wie modern der Schnitt war, dass der Rock etwas weiter war und dass alle Naehte mit Querband versaeubert wurde. GENIAL!


986c5b1c-ff19-4f38-bed8-6d3784f9c1b3.jpg
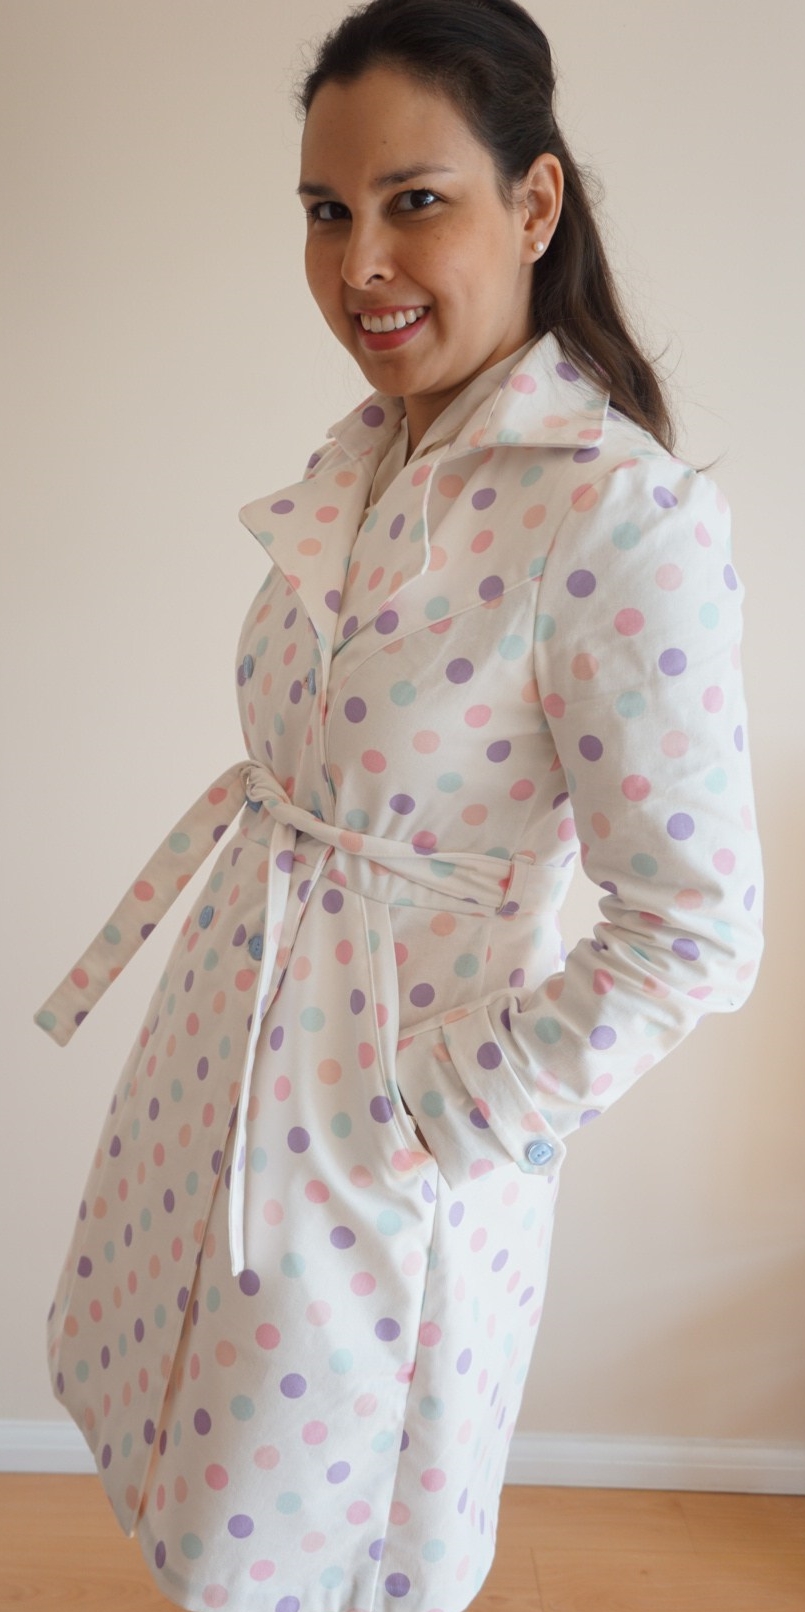
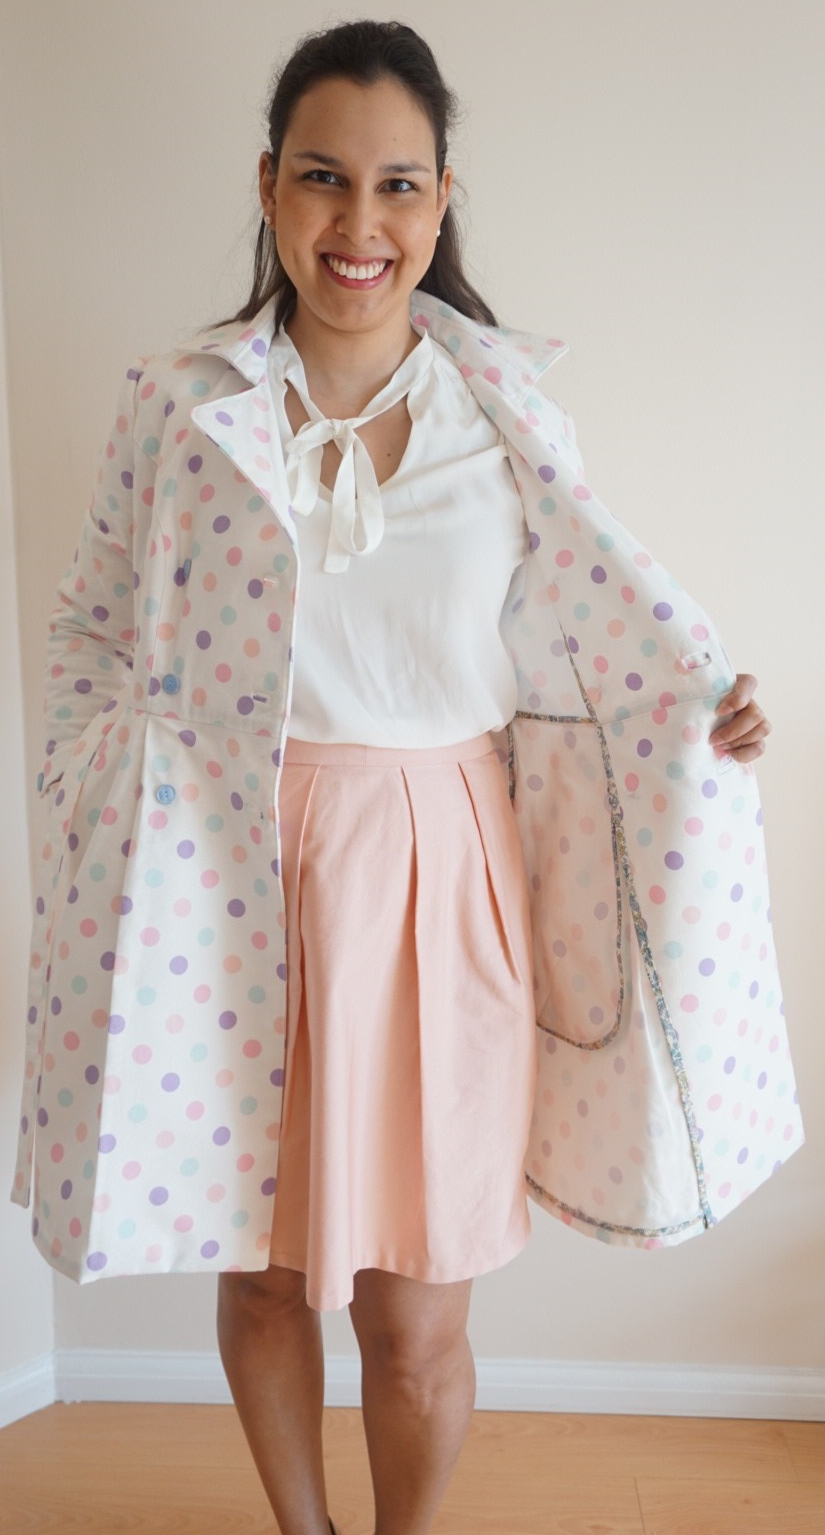
I ordered 4 meters of peachy-blushy twill off eBay, unfortunately it’s currently sold out, but they have some really nice alternative colors, so take a look! The fabric was only 1.10m wide and I was sweating bullets because I wasn’t sure if it would be enough. I cut a straight size 40 and managed to get all the pieces out of the 4 meter, PHEW!!!(I did lengthen the skirt by 2 inches, because I wanted the trench to be a bit longer!) For the bias binding I looked through my stash of liberty pieces and found a vintage looking yellow piece which was about 45 cm long. I cut 2.5 inch strips on the bias and then sewed all the pieces into one long strip. I then folded the strip in half and pressed it, I usually do this, when I make binding for my quilts and it always turns out great, so NO REGRETS!!! I think the hardest part of making this coat is really cutting everything out and preparing the fabric and ironing it.

DE: Ich bestellte 4 Meter von einem Rosa-Pfirsich Twill ueber eBay, die Farbe ist leider ausverkauft, aber der Haendler hat noch viele schoene andere Farben, also tobt euch aus! Der Stoff war jedoch nur 1.10m breit, und ich hatte etwas Panik, dass ich nicht genug Stoff hatte um alle Teile ausschneiden zu koennen, aber Entwarnung, es ging sich aus! Ich habe Groesse 40 ohne irgendwelche Anpassungen  ausgeschnitten. Fuer das Querband habe ich mein Lager durchkaemmt und einen Liberty Stoff in Gelb Toenen gefunden den ich dann in 2.5inch Streifen geschnitten habe und dann in Querband verarbeitet habe.  Diese Methode verwende ich fuer meine Quilts und bisher ist auch nie etwas schief gegangen. Ich muss zugeben, das anstrengendste an diesem Muster ist wahrscheinlich das Ausschneiden und das Produzieren von Querband!

c85a31e9-bee3-44fb-815a-1b1e51c99b4e.jpg

EN: To the instructions, if you are looking for some serious handholding while making this, you will be disappointed. The instructions have illustrations, but are brief and to the point. I recommend looking at YouTube videos if you are unsure on how to attach the binding or how to make the bound button holes. I think Deer and Doe try to cater to seamstresses, that have a little bit more experience, which isn’t a bad thing at all, however if I were a beginner, I might need some help.

DE: Was die Anleitung angeht, solltest du darauf hoffen, dass man dir die Hand haelt und dir alles  erklaert, wirst du enttaeuscht sein. Deer and Doe gehen davon aus, dass ihre Kunden schon etwas Erfahrung haben, es gibt zwar Bilder fuer alle Schritte, aber die Erlaeuterungen dazu sind meistens kurz gehalten. Solltest du also nicht genau wissen, wie du mit dem Querband hantieren sollst oder nicht genau verstehst, was du mit den Knopfloechern machen sollst, empfehle ich dir YouTube!!

ba6f67f5-b557-408b-9980-780bb90df453.jpg

EN: Putting the coat together was really straight forward, I’ve sewn a few things from Deer and Doe before and they always come together beautifully, I love the very chic finish, Hong Kong binding really is something special, isn’t it? I just realized that I haven’t made any effort to pretty up my seams since I’ve gotton my overlocker, I used to french seam everything =/

I used some pretty vintage buttons from my button stash, they are from the 1960’s and were made in the Czech Republic! LIKE A BOSS!I love my new trench coat sooooooooooo much!!

PS: The dress I’m wearing is my second Vintage Shirtdress by Sewoverit, it’s also my favorite.


DE: Was das tatsaechliche naehen des Trench Coats angeht, kam alles erstaunlich schnell zusammen, ich hatte schon einmal einen Schnitt von Deer und Doe probiert und mir gefielt, dass alle Markierungen gepasst haben und das Endprodukt immer sehr schick und sauber ausfiel. Das alle Naehte mit Querband versaeubert wurden fand ich echt super, das ist so ein toller Eyecatcher, wenn man den Mantel aufmacht!

Ich habe vintage Knoepfe aus meinem Lager verwendet, die stammen aus den 1960s aus der Tschechischen Republik, ich finde die passen hervorragend zum Mantel! Ich liebe meinen neuen Trench und bis so froh, dass ich mich an diesen Schnitt getraut habe!

PS: Das Kleid ist uebrigens mein zweites Vintage Shirtdress von Sewoverit, es ist auch mein Lieblingskleid.

27779F8D-0868-4450-9B56-0E5B7B7644EB


My Flying Geese Quilt -or back to basics

DSC04767

EN: The first thing I ever sewed was a quilt, in fact I taught myself how to sew by making a quilt cover, and watching many, many tutorials on Youtube. The quilts were all very pink, and uneven, because I cut everything out with scissors instead of using a rotary cutter and a ruler…and since I didn’t know how to backstitch…the quilts all fell apart, once I put them in the washer for a spin. I also never attempted to actually quilt them myself, because I didn’t think my sewing machine could handle it and I didn’t have a walking foot, back then. OOPS!

DE: Mein allererstes Naehprojekt war eine Decke, Ich habe mir damals das Naehen mit Youtube videos beigebracht, mit teilweise sehr lustigen Ergebnissen. Alle Decken waren total schief, weil ich die einzelnen Teile mit einer Schere ausgeschnitten hatte, und nicht einen Rotary Cutter oder ein Lineal verwendet habe. Auch wusste ich nicht, dass man immer ein paar Rueckstiche machen sollte, wenn man mit dem naehen beginnt oder endet… Ich glaube, ich muss euch nicht erzaehlen, was passiert ist, als ich meine sehr Pinke Decken in die Waschmaschine geworfen habe…. =/

DSC04751

EN:Until late last year all I ever sewed, were clothes and the occasional curtain or pillow cover and I didn’t have any further aspirations to go back to basics aka take on quilts again. I did however take up English Paper Piecing and fell down the rabbit hole  making hundreds of  2.5 inch hexagons. As tedious as that sounds, I really enjoyed making tiny little hexagons and basting them by hand. I was looking at some Youtube videos and stumbled over a Flying Geese ruler and was mesmerized, in fact I was so impressed by the whole video, that I ordered that ruler over Amazon that same day and started on my new quilt that week.

DE: Ich habe bis letztes Jahr ausschliesslich Kleidung genaeht, natuerlich habe ich den einen oder anderen Kissenbezug und eine Gardine genaeht, aber das fand ich nicht Ansatzweise so toll wie Klamotten naehen. Ich konnte mir auch ueberhaupt nicht vorstellen, noch einmal eine Decke zu naehen, und dann stolperte ich ueber das English Paper Piecing und legt alle meine Naehprojekte auf Eis. Es gefiehl mir sehr gut die kleinen Stuecke Papier mit Stoff zu umwickeln und mit der Hand zu steppen, es gefiel mir so gut, dass ich fast 700 Stueck naehte um sie dann anschliessend in eine Decke umzuwandeln. LOL!! Ich hatte mir ein paar Youtube videos dazu angesehen und saht ein Tutorial fuer ein Flying Geese Lineal und war von den Socken! Ich habe das Lineal auf Amazon gefunden und es bestellt und innerhalb wenigen Tagen diese Decke begonnen.

DSC04752

EN:I had ordered a bag of liberty bits from Kat’s Fabrics, (she sells offcuts by the kilo, I will not lie I have another kilo of liberty bits in my stash just waiting for me to make them into another quilt!) a few weeks prior to make even more hexagons and then abandoned the idea to make this quilt. I didn’t use a pattern and instead just made a few geese and then arranged them into different patterns, until I liked what I saw. EASY! For the backing I used 2.5 meters of Liberty that I got for a steal at the Rag Market in Birmingham and then added 40 cm of white brushed cotton on both sides. I used the leftover Liberty backing to make my own bias binding, as I felt it would make the entire quilt look a little more polished.

DE: Ich hatte vor einigen Wochen ein Kilo Liberty Stoffe von Kat’s Fabric bestellt, (sie verkauft sonst immer Liberty Stoffe in 2-3 Meter Laenge) um weitere Hexagone zu basteln, beschloss aber die Stoffe nun fuer die neue Decke zu benutzen. Ich habe kein Muster verwendet sondern einfach einige Gaense erstellt und dann einfach alle so lang angeordnet, bis ich damit zufrieden war. EASY!!! Fuer die Rueckseite der Decke habe ich auch einen Liberty Stoff benutzt, den ich in Birmingham auf dem Stoffmarkt gekauft hatte, es handelt sich hier um B-Ware, der Preis dafuer war daher sehr guenstig! =D Das Querband habe ich dann mit den Resten selber genaeht, gebraucht habe ich 8 Meter… ich habe noch 7 Meter uebrig, die ich fuer irgendetwas anderes nutzen kann.

DSC04756

DE:I would say the entire process took me about 6 weeks, I ran out of white cotton a few times and then couldn’t decide what to do about the backing. Once I had finished the quilt top I posted a picture of it on Instagram and asked if anyone had ever used a quilting service before, and was put in touch with the fantastic Cath who took on my quilt.What can I say about Cath, she’s an amazing longarm quilter based out of Cumbria, you can get in touch with her over her Facebook or Instagram account. She gave me all the information I needed before I sent out my parcel, asked me what I kind of quilting I would like and sent me many pictures of patterns until I found what I was looking for. She quilted everything within 3 days of getting my  parcel and sent it back, so that I would have it for the weekend. The results are absolutely fantastic, THANK YOU SO MUCH CATH!! There is no way that I could have even come close to what she did and I am eternally grateful.

DE: Fuer die Zusammensetzung habe ich ca. 6 Wochen  gebraucht, mir ist mehrmals der weisse Stoff ausgegangen und ich konnte  mich lange nicht entscheiden, was ich mit der Rueckseite machen wollte. Als ich dann endgueltig fertig war, habe ich ein Bild auf Instagram hochgeladen und die Community gefragt, ob jemand den einen Quilting Service verwendet hatte. So habe ich Kontakt mit Cath aufgenommen, die eine Longarm Quilterin aus Cumbria ist. Sie hat mich unheimlich gut beraten und die Decke innerhalb von 3 Tagen Versandfertig, gequiltet. Ich bin immer noch total geschockt, wie schnell das alles ging und wie toll die Decke geworden ist! VIELEN DANK CATH!

DSC04750

EN:All I did to finish of my Flying geese quilt was to sew on the binding, with my sewing machine on the one side and slip stitch it by hand on the other side. I really enjoy hand sewing  things, and watched the entire second season of Fortitude, which was crazy!!!!Anyway, making this, has really peaked my interest in quilting again, I’ve since bought a few modern quilting books and started on another quilt for my sofa! And even shocking myself, I have gotten in touch with the Modern Quilting Guild in Munich, so I will hopefully meet other avid quilters once I move back! I feel incredible proud of what I’ve done and I hope that perhaps other seamstresses might take on quilting as well.

DE: Ich habe zum Schluss nur noch das Querband an der Rueckseite der Decke mit der Maschine angenaeht und an der anderen Seit mit der Hand fest gesteppt, dabei habe ich mir die zweite Staffel Fortitude angeschaut, die absolut verrueckt war!!!Zur guter Letzt muss ich sagen, dass seitdem ich mit der Decke fertig geworden bin, ich mich wieder unheimlich fuers quilten begeistern kann. Ich habe mir ein paar Buecher fuer Moderne Quilts gekauft und habe mich bei der Modern Quilting Guild Munich gemeldet in der Hoffnung, dass wenn ich Ende Mai wieder nach Deutschland ziehe, Kontakt zu anderen Quilterinnen finde. Ich hoffe, dass sich vielleicht andere Naeherinnen auch fuers Quilten begeistern koennen, ich habe mittlerweile eine neue Decke fuer mein Sofa begonnen. =D

DSC04764