Patiently waiting for spring – Holly blouse, Tulip skirt and Luzerne coat

img_3460.jpg

EN:I think it’s safe to say, that we are all waiting for spring to finally arrive and to start wearing clothes with colors!

When Sewoverit released their Tulip Skirt last year, I was on it like white on rice, I printed it off, chose the fabric and then promptly forgot to make it up. THE HORROR!! I still had a meter of blush twill left over from my first Luzerne coat and thought it would make a great Spring wardrobe staple. I WAS RIGHT!

I think it took me exactly 2 hours to cut and sew this skirt, which also included hand sewing the hem, for a nicer finish. I cut a straight size 12 and added 1.5 inches for length. So far, I’ve always had really great experiences with Sewoverit. All the notches matched up and the instructions are clear and easy to understand. I didn’t have enough fabric to sew the waistband in one, so there is a seam in the middle, at first this really annoyed me, but I have since decided it’s a cool design feature. SORTED!! I used an invisible zipper that went in without a hitch ( is it me, or do these kinds of zips go in perfectly the first time or you have to unpick it 30 times? yes, no??? Let me know!!)

EASY PEASY LEMON SQUEEZY!


img_3513.jpg

DE: Ich weiss nicht wie es euch geht, aber meiner Meinung nach, kann nun endlich der Frühling kommen!

Als Sewoverit ihr letztes Jahr ihren Tulip Skirt veröffentlicht hatten, war ich ganz hin und weg, ich habe den Schnitt sofort ausgedruckt, einen Stoff aus meinem Lager gewählt nur um anschlissend meinen ganzen Plan zu vergessen. UPS!! Ich hatte noch einen Meter von meinem rosa Twill übrig, ein Reststück von meinen ersten LuzerneMantel und dachte es wuerde sich recht gut dazu eignen, meinen Kleiderschrank Fruehlings tauglich zu machen.


Ich glaube, es dauerte genau 2 Stunden den Rock auszuschneiden und anschliessend zu nähen, den Saum nähte ich mit der Hand, da ich finde, dass der Rock so etwas schöner aussieht. Ich habe die Größe 12 gewählt und 1,5 Zoll Länge hinzugefügt, da der Rock mir wohl zu kurz geworden wäre.  Bisher hatte ich immer gute Erfahrungen mit Sewoverit, die Anweisungen sind klar und leicht verständlich und ich denke der Schnitt wäre auch für Anfänger sehr einfach zu bewähltigen. Ich hatte nicht genug Stoff um den Bund aus einem Stück zu nähen, weshalb ich nun genau in der Mitte einen Saum habe. Zuerst ärgerte mich das ungemein darüber, mittlerweile habe ich mich damit abgefunden und finde, es könnte glatt zum Design dazu gehören. (Ich glaube das rede ich mir immer noch ein…)  Ich habe einen verdeckten Reißverschluss verwendet, der gleich beim ersten Mal problemlos eingenäht werden konnte (ist das nur bei mir so, dass bei dieser Art von Reißverschlüssen das einnähen entweder beim ersten Mal perfekt funktioniert oder man musst es 30mal aufzutrennen? Ja, Nein??? Lasst es mich wissen!!)

EASY PEASY LEMON SQUEEZY!

img_3511.jpg

EN: So the Holly Blouse! This is the first time I’ve ever used a Style Arc pattern, I’ve been admiring their vast range of ready to wear patterns, that are all so on trend and finally pulled the trigger and  I ordered a pattern off Amazon, so I’d have it by the next day, which I think is just brilliant! My love for bow blouses is well documented on my IG account, but I decided to branch out and try a new pattern.

I chose a very nice white silk crepe and cut out all the pieces with a rotary cutter, which worked out really well. I cut out a size 10 and didn’t change a single thing. The construction is quite simple if you’ve sewn a few blouses before, the instructions are  limited, but they do give you a few pointers which is helpful. The other thing that you might want to take into consideration, is that the seam allowance is only 1 cm, I personally thought that was more than enough to make French seams with it, because PRETTY INSIDES!!

I used a very light weight interfacing for the cuffs and the facings and sewed with Rayon thread from Gütermann. I read somewhere that cotton thread can be a bit to heavy for silk fabric and might make the seams look a bit puckered. I actually bought a whole bunch of this stuff at the last Hobbycraft sale where all the Gütermann thread was going for half the price!!!!

img_3506.jpg

DE: Zu der Bluse, ich habe bisher noch nie ein Muster von Style Arc verwendet, habe aber  schon sehr lange ihre Vielzahl von modernen Schnitte bewundert und als  ich dann mit dem Rock fertig war, dachte ich, “Jetzt brauchst du dazu auch eine neue Bluse!” Bisher habe ich immer den Blusen Schnitt von Sewoverit verwendet (mit Sicherheit 7 Mal, Bilder dazu findet ihr auf meine IG account) aber ich dachte, ich probier mal etwas neues aus. Style Arc Papierschnitte kann man übrigens über Amazon bestellen, was sehr praktisch ist, vorallem, wenn sie am nächsten Tag im Briefkasten sind! YAS!!!!

Der Blusen Schnitt heist Holly, ich habe weisse Seide verwendet und alles mit meinem Rotary Cutter (was ist hierfür bitte das richtige Deutsche Wort?? Laut Leo ist das Rollfräse…) ausgeschnitten, was deutlich schmerzfreier war, als alles mit meiner Schere aus zuschneiden! Ich habe die Groesse 10 ausgeschnitten und absolut nichts am Schnitt verändert. Genäht habe ich alles mit einem Rayon Faden von Gütermann, da ich einmal gelesen habe, dass Baumwollfaden zu schwer fuer Seide sei und man dann hässliche Kräuselungen bei der Naht bekommt, dies wollte ich auf jeden Fall verhindern. Das hat übrigens echt super funktioniert und die Bluse war in wenigen Stunden fertig gestellt.

img_3504.jpg

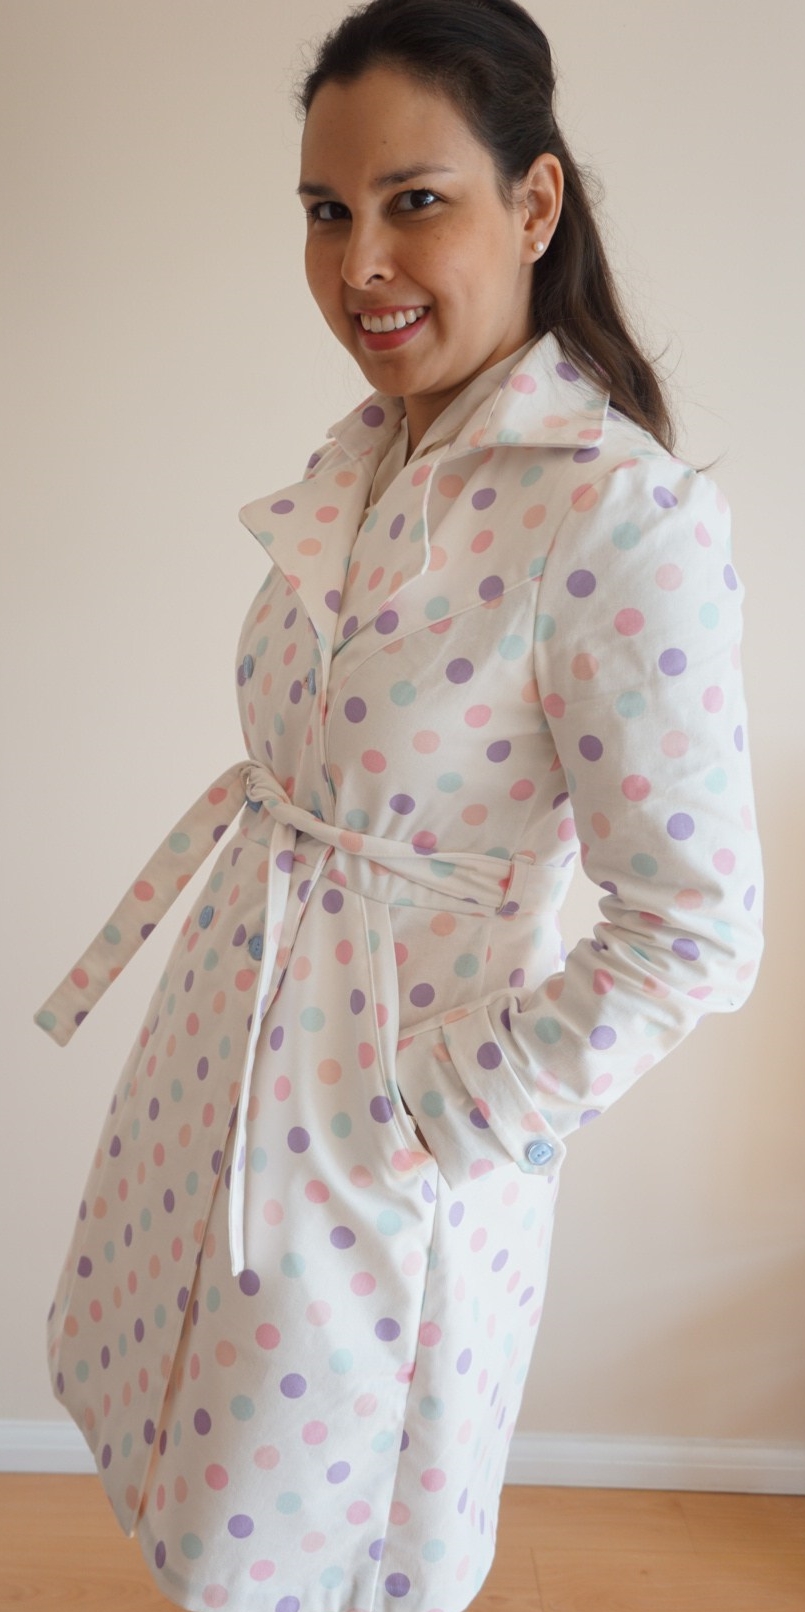
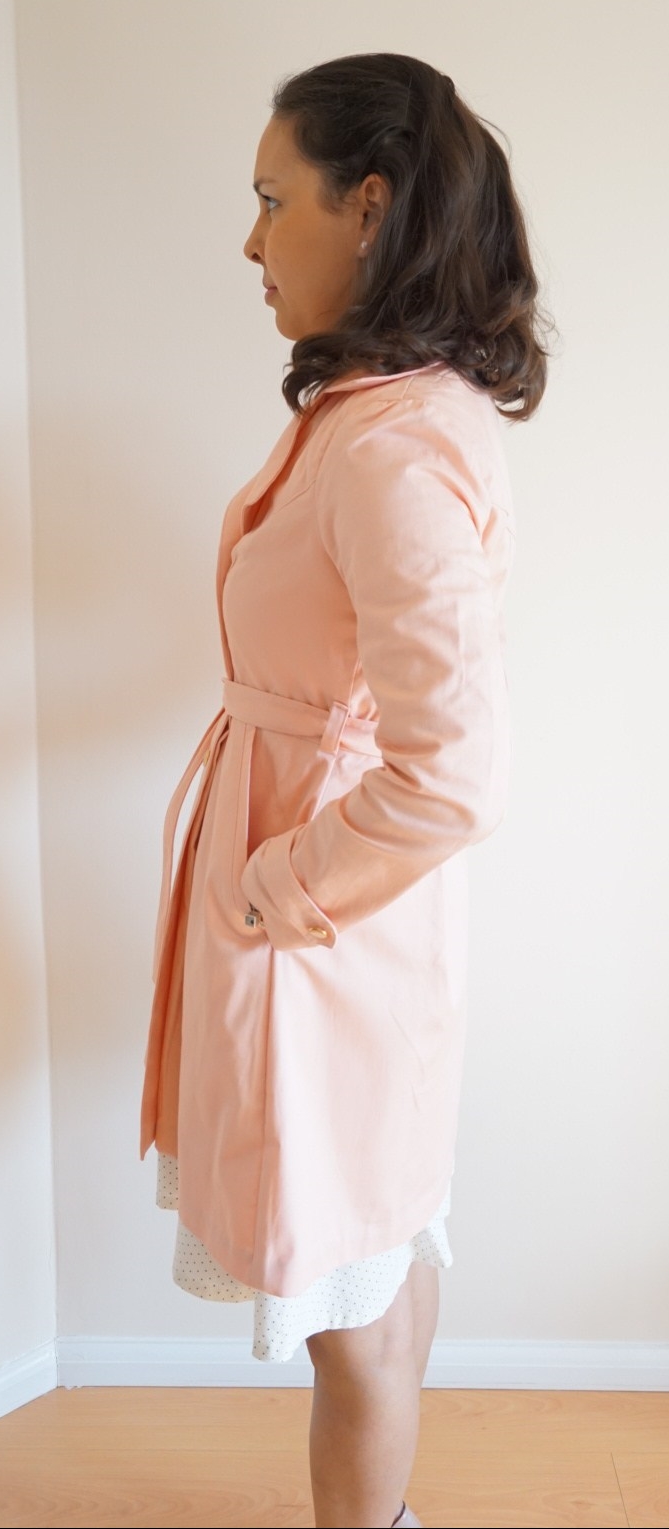
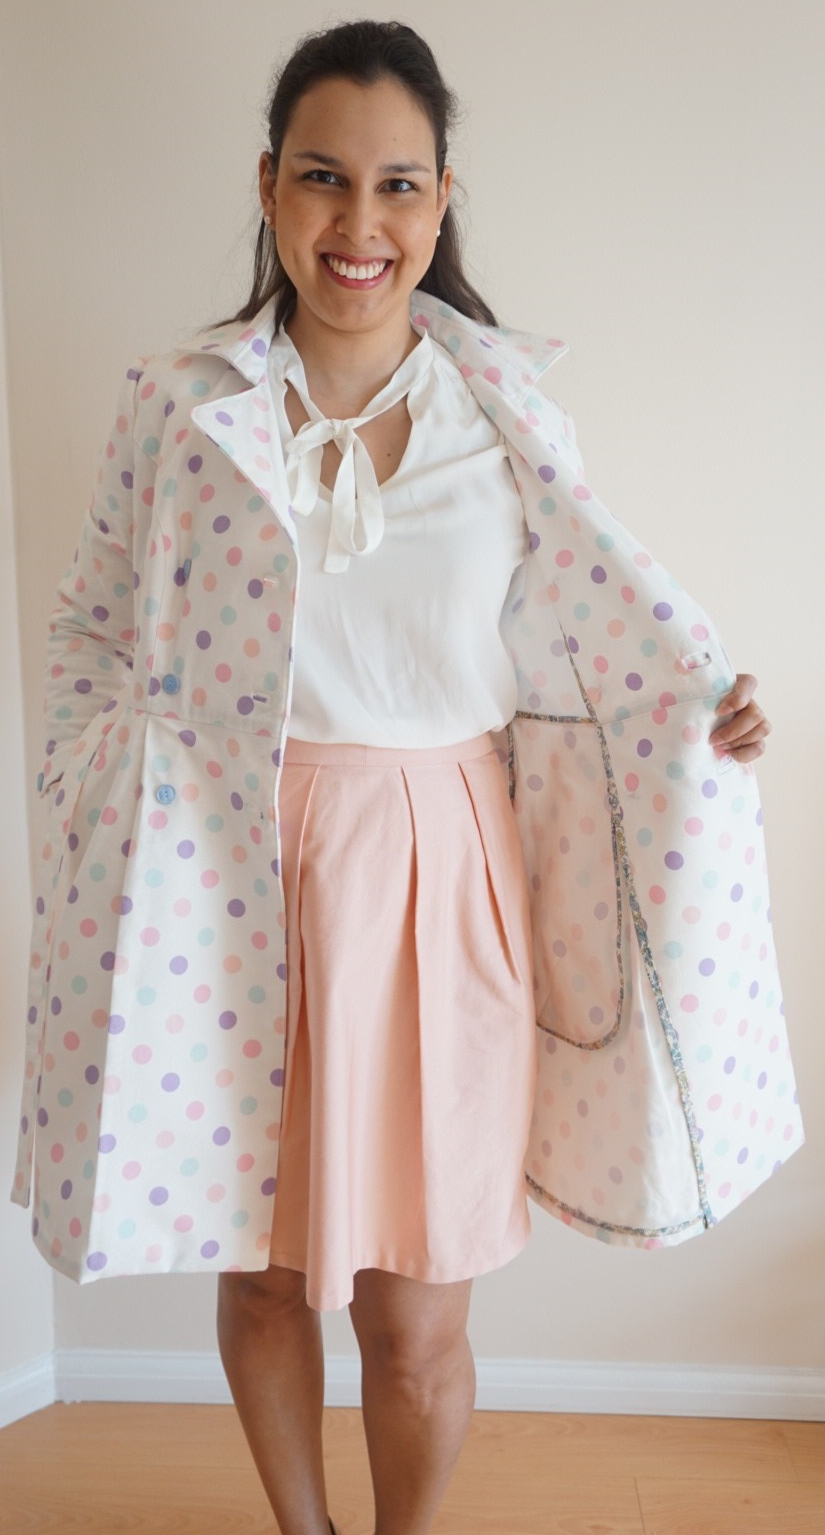
EN:  As no spring outfit is complete without a proper coat, in the UK, I made another Deer and Doe Luzerne trench coat. For this version I used a cotton canvas from Barry’s in Birmingham, as the fabric was a bit see through, I opted to interline it was an interfacing meant for wool coats. The interlining made the fabric drape really nicely and it also made it opaque, WIN-WIN. I cut a straight size 40 and lengthened the skirt by 2 inch, I also used some vintage glass buttons from my stash that kind of blend into my coat, which isn’t a bad thing per say…

I made bias binding out of left over Liberty I had in my stash, however.. IT DOESN’T GO WITH MY COAT AT ALL… AT ALL!!!! WHAT WAS I THINKING?? Anyway, I’ve decided nobody but I will see it, so there’s that. Construction wise this took a lot less time to make up the second time round. My bound button holes look sooooo much neater, I finished watching Emerald City on catch-up TV and had a brand new coat. =D

I love it so very much, and must now sewing many new outfit that go with it, so I can wear it out! #nevernotsewing

So this is my way of reigning in Spring, I want all the pastel colors and the fun outfits.

Also, have a look at all the other fabulous spring outfits on today’s MeMadeMittwoch!

img_3503.jpg

DE: Da im  Vereinigten Königreich, kein Frühlingsoutfit  ohne einen richtigen Mantel komplett ist, habe ich einen weiteren Deer and Doe Luzerne Trenchcoat genäht. Für diese Version, habe ich einen BaumwollCanvas von Barry’s in Birmingham verwendet, da der Stoff ein bisschen durchsichtig war, entschied ich mich für eine Vlieseline die eigentlich für Wollmäntel gedacht ist. Die Einlage hat den Stoff wirklich schön drapieren lassen und machte es auch weniger durchsichtig, WIN-WIN. Ich habe wieder die Grösse 40 genäht, den Rock um 2 Zoll verlängert und vintage Glass Knöpfe aus meinem Lager verwendet.

Ich habe Schrägband aus Liberty Resten, die ich in meinem Lager hatte, gefertigt… NUR, PASST ES ÜBERHAUPT NICHT ZU MEINEM MANTEL ÜBERHAUPT NICHT!!! WAS HABE ICH MIR NUR DABEI GEDACHT?? Jedenfalls habe ich mich entschlossen, dass niemand, ausser mir das sehen wird, also basta!

Was die Konstruktion des Mantels angeht, dauerte es diesmal deutlich viel weniger Zeit alles zu nähen. Meine Knopflöcher sehen so viel ordentlicher aus, ich habe die letzten paar Folgen Emerald City im Catch-Up TV geschaut und hatte plötzlich einen neuen Trench!

Ich liebe meinen neuen Mantel  so sehr und nun muss ich lauter Outfits passend dazu nähen, damit ich ihn auch regelmässig tragen kann! #nevernotsewing

Viele weitere Fruehlingsoutfits koennt ihr heute beim MeMadeMittowch bestaunen.


My Deer and Doe Luzerne Trench Coat

d6af7171-b21e-4004-9a91-4ddc622086f1.jpg

EN: A few weeks ago I was walking around the top floor of the Bullring in Birmingham, when I came across the most amazing blush lace trench coat by Burberry, needless to say it was way out of my budget, but I couldn’t stop thinking about it. I was in dire need of a new trench coat, my old one is 8 years old and way too small… so I started looking at different patterns from Burda to McCall’s to Vogue to the Robson Coat, but none of them really appealed to me. I think one of the reasons was, that thy all looked a bit too classic (and some looked a bit dated, to be honest…) Then Deer and Doe and wonderfully chic French sewing label released their new spring collection, and would you believe it, they had a cute, modern trench coat that ticked all the boxes for me. It had a fuller skirt, bound button holes and was finished with bias binding. You can guess how long it took me to press order!

DE: Vor einigen Wochen habe ich einem Kaufhaus in Birmingham den allerschoensten Rosa farbenen Spitzen Trench Coat von Burberry entdeckt. Es war Liebe auf den ersten Blick, aber mein Geldbeutel machte mir da ganz klar einen Strich durch die Rechnung. Ich habe noch Tage spaeter an diesen Trench gedacht und beschlossen mir selber einen zu naehen, mein alter Trench war schon fast 8 Jahre alt und mir viel zu eng. Es begann die Suche nach dem passenden Schnitt, ich schaute mir Muster von Burda, McCalls und Vogue and geliebaeugelte den Robson Coat, aber DER RICHTIGE war irgendwie nicht dabei. Ich vermute, viele der Schnitte waren mir ein wenig zu klassisch und zum Teil auch etwas altbacken. =/ ABER DANN! Deer und Doe, dieses fantastisch, schicke Franzoesische Schnittmusterlabel bracht 3 neue Muster, Anfang letzter Woche auf den Markt und deren Trench Coat der Luzerne, war genau dass, was ich gesucht hatte. Mir gefiel wie modern der Schnitt war, dass der Rock etwas weiter war und dass alle Naehte mit Querband versaeubert wurde. GENIAL!


986c5b1c-ff19-4f38-bed8-6d3784f9c1b3.jpgI ordered 4 meters of peachy-blushy twill off eBay, unfortunately it’s currently sold out, but they have some really nice alternative colors, so take a look! The fabric was only 1.10m wide and I was sweating bullets because I wasn’t sure if it would be enough. I cut a straight size 40 and managed to get all the pieces out of the 4 meter, PHEW!!!(I did lengthen the skirt by 2 inches, because I wanted the trench to be a bit longer!) For the bias binding I looked through my stash of liberty pieces and found a vintage looking yellow piece which was about 45 cm long. I cut 2.5 inch strips on the bias and then sewed all the pieces into one long strip. I then folded the strip in half and pressed it, I usually do this, when I make binding for my quilts and it always turns out great, so NO REGRETS!!! I think the hardest part of making this coat is really cutting everything out and preparing the fabric and ironing it.

DE: Ich bestellte 4 Meter von einem Rosa-Pfirsich Twill ueber eBay, die Farbe ist leider ausverkauft, aber der Haendler hat noch viele schoene andere Farben, also tobt euch aus! Der Stoff war jedoch nur 1.10m breit, und ich hatte etwas Panik, dass ich nicht genug Stoff hatte um alle Teile ausschneiden zu koennen, aber Entwarnung, es ging sich aus! Ich habe Groesse 40 ohne irgendwelche Anpassungen  ausgeschnitten. Fuer das Querband habe ich mein Lager durchkaemmt und einen Liberty Stoff in Gelb Toenen gefunden den ich dann in 2.5inch Streifen geschnitten habe und dann in Querband verarbeitet habe.  Diese Methode verwende ich fuer meine Quilts und bisher ist auch nie etwas schief gegangen. Ich muss zugeben, das anstrengendste an diesem Muster ist wahrscheinlich das Ausschneiden und das Produzieren von Querband!

c85a31e9-bee3-44fb-815a-1b1e51c99b4e.jpg

EN: To the instructions, if you are looking for some serious handholding while making this, you will be disappointed. The instructions have illustrations, but are brief and to the point. I recommend looking at YouTube videos if you are unsure on how to attach the binding or how to make the bound button holes. I think Deer and Doe try to cater to seamstresses, that have a little bit more experience, which isn’t a bad thing at all, however if I were a beginner, I might need some help.

DE: Was die Anleitung angeht, solltest du darauf hoffen, dass man dir die Hand haelt und dir alles  erklaert, wirst du enttaeuscht sein. Deer and Doe gehen davon aus, dass ihre Kunden schon etwas Erfahrung haben, es gibt zwar Bilder fuer alle Schritte, aber die Erlaeuterungen dazu sind meistens kurz gehalten. Solltest du also nicht genau wissen, wie du mit dem Querband hantieren sollst oder nicht genau verstehst, was du mit den Knopfloechern machen sollst, empfehle ich dir YouTube!!

ba6f67f5-b557-408b-9980-780bb90df453.jpg

EN: Putting the coat together was really straight forward, I’ve sewn a few things from Deer and Doe before and they always come together beautifully, I love the very chic finish, Hong Kong binding really is something special, isn’t it? I just realized that I haven’t made any effort to pretty up my seams since I’ve gotton my overlocker, I used to french seam everything =/

I used some pretty vintage buttons from my button stash, they are from the 1960’s and were made in the Czech Republic! LIKE A BOSS!I love my new trench coat sooooooooooo much!!

PS: The dress I’m wearing is my second Vintage Shirtdress by Sewoverit, it’s also my favorite.


DE: Was das tatsaechliche naehen des Trench Coats angeht, kam alles erstaunlich schnell zusammen, ich hatte schon einmal einen Schnitt von Deer und Doe probiert und mir gefielt, dass alle Markierungen gepasst haben und das Endprodukt immer sehr schick und sauber ausfiel. Das alle Naehte mit Querband versaeubert wurden fand ich echt super, das ist so ein toller Eyecatcher, wenn man den Mantel aufmacht!

Ich habe vintage Knoepfe aus meinem Lager verwendet, die stammen aus den 1960s aus der Tschechischen Republik, ich finde die passen hervorragend zum Mantel! Ich liebe meinen neuen Trench und bis so froh, dass ich mich an diesen Schnitt getraut habe!

PS: Das Kleid ist uebrigens mein zweites Vintage Shirtdress von Sewoverit, es ist auch mein Lieblingskleid.

27779F8D-0868-4450-9B56-0E5B7B7644EB


My Flying Geese Quilt -or back to basics

DSC04767

EN: The first thing I ever sewed was a quilt, in fact I taught myself how to sew by making a quilt cover, and watching many, many tutorials on Youtube. The quilts were all very pink, and uneven, because I cut everything out with scissors instead of using a rotary cutter and a ruler…and since I didn’t know how to backstitch…the quilts all fell apart, once I put them in the washer for a spin. I also never attempted to actually quilt them myself, because I didn’t think my sewing machine could handle it and I didn’t have a walking foot, back then. OOPS!

DE: Mein allererstes Naehprojekt war eine Decke, Ich habe mir damals das Naehen mit Youtube videos beigebracht, mit teilweise sehr lustigen Ergebnissen. Alle Decken waren total schief, weil ich die einzelnen Teile mit einer Schere ausgeschnitten hatte, und nicht einen Rotary Cutter oder ein Lineal verwendet habe. Auch wusste ich nicht, dass man immer ein paar Rueckstiche machen sollte, wenn man mit dem naehen beginnt oder endet… Ich glaube, ich muss euch nicht erzaehlen, was passiert ist, als ich meine sehr Pinke Decken in die Waschmaschine geworfen habe…. =/

DSC04751

EN:Until late last year all I ever sewed, were clothes and the occasional curtain or pillow cover and I didn’t have any further aspirations to go back to basics aka take on quilts again. I did however take up English Paper Piecing and fell down the rabbit hole  making hundreds of  2.5 inch hexagons. As tedious as that sounds, I really enjoyed making tiny little hexagons and basting them by hand. I was looking at some Youtube videos and stumbled over a Flying Geese ruler and was mesmerized, in fact I was so impressed by the whole video, that I ordered that ruler over Amazon that same day and started on my new quilt that week.

DE: Ich habe bis letztes Jahr ausschliesslich Kleidung genaeht, natuerlich habe ich den einen oder anderen Kissenbezug und eine Gardine genaeht, aber das fand ich nicht Ansatzweise so toll wie Klamotten naehen. Ich konnte mir auch ueberhaupt nicht vorstellen, noch einmal eine Decke zu naehen, und dann stolperte ich ueber das English Paper Piecing und legt alle meine Naehprojekte auf Eis. Es gefiehl mir sehr gut die kleinen Stuecke Papier mit Stoff zu umwickeln und mit der Hand zu steppen, es gefiel mir so gut, dass ich fast 700 Stueck naehte um sie dann anschliessend in eine Decke umzuwandeln. LOL!! Ich hatte mir ein paar Youtube videos dazu angesehen und saht ein Tutorial fuer ein Flying Geese Lineal und war von den Socken! Ich habe das Lineal auf Amazon gefunden und es bestellt und innerhalb wenigen Tagen diese Decke begonnen.

DSC04752

EN:I had ordered a bag of liberty bits from Kat’s Fabrics, (she sells offcuts by the kilo, I will not lie I have another kilo of liberty bits in my stash just waiting for me to make them into another quilt!) a few weeks prior to make even more hexagons and then abandoned the idea to make this quilt. I didn’t use a pattern and instead just made a few geese and then arranged them into different patterns, until I liked what I saw. EASY! For the backing I used 2.5 meters of Liberty that I got for a steal at the Rag Market in Birmingham and then added 40 cm of white brushed cotton on both sides. I used the leftover Liberty backing to make my own bias binding, as I felt it would make the entire quilt look a little more polished.

DE: Ich hatte vor einigen Wochen ein Kilo Liberty Stoffe von Kat’s Fabric bestellt, (sie verkauft sonst immer Liberty Stoffe in 2-3 Meter Laenge) um weitere Hexagone zu basteln, beschloss aber die Stoffe nun fuer die neue Decke zu benutzen. Ich habe kein Muster verwendet sondern einfach einige Gaense erstellt und dann einfach alle so lang angeordnet, bis ich damit zufrieden war. EASY!!! Fuer die Rueckseite der Decke habe ich auch einen Liberty Stoff benutzt, den ich in Birmingham auf dem Stoffmarkt gekauft hatte, es handelt sich hier um B-Ware, der Preis dafuer war daher sehr guenstig! =D Das Querband habe ich dann mit den Resten selber genaeht, gebraucht habe ich 8 Meter… ich habe noch 7 Meter uebrig, die ich fuer irgendetwas anderes nutzen kann.

DSC04756

DE:I would say the entire process took me about 6 weeks, I ran out of white cotton a few times and then couldn’t decide what to do about the backing. Once I had finished the quilt top I posted a picture of it on Instagram and asked if anyone had ever used a quilting service before, and was put in touch with the fantastic Cath who took on my quilt.What can I say about Cath, she’s an amazing longarm quilter based out of Cumbria, you can get in touch with her over her Facebook or Instagram account. She gave me all the information I needed before I sent out my parcel, asked me what I kind of quilting I would like and sent me many pictures of patterns until I found what I was looking for. She quilted everything within 3 days of getting my  parcel and sent it back, so that I would have it for the weekend. The results are absolutely fantastic, THANK YOU SO MUCH CATH!! There is no way that I could have even come close to what she did and I am eternally grateful.

DE: Fuer die Zusammensetzung habe ich ca. 6 Wochen  gebraucht, mir ist mehrmals der weisse Stoff ausgegangen und ich konnte  mich lange nicht entscheiden, was ich mit der Rueckseite machen wollte. Als ich dann endgueltig fertig war, habe ich ein Bild auf Instagram hochgeladen und die Community gefragt, ob jemand den einen Quilting Service verwendet hatte. So habe ich Kontakt mit Cath aufgenommen, die eine Longarm Quilterin aus Cumbria ist. Sie hat mich unheimlich gut beraten und die Decke innerhalb von 3 Tagen Versandfertig, gequiltet. Ich bin immer noch total geschockt, wie schnell das alles ging und wie toll die Decke geworden ist! VIELEN DANK CATH!

DSC04750

EN:All I did to finish of my Flying geese quilt was to sew on the binding, with my sewing machine on the one side and slip stitch it by hand on the other side. I really enjoy hand sewing  things, and watched the entire second season of Fortitude, which was crazy!!!!Anyway, making this, has really peaked my interest in quilting again, I’ve since bought a few modern quilting books and started on another quilt for my sofa! And even shocking myself, I have gotten in touch with the Modern Quilting Guild in Munich, so I will hopefully meet other avid quilters once I move back! I feel incredible proud of what I’ve done and I hope that perhaps other seamstresses might take on quilting as well.

DE: Ich habe zum Schluss nur noch das Querband an der Rueckseite der Decke mit der Maschine angenaeht und an der anderen Seit mit der Hand fest gesteppt, dabei habe ich mir die zweite Staffel Fortitude angeschaut, die absolut verrueckt war!!!Zur guter Letzt muss ich sagen, dass seitdem ich mit der Decke fertig geworden bin, ich mich wieder unheimlich fuers quilten begeistern kann. Ich habe mir ein paar Buecher fuer Moderne Quilts gekauft und habe mich bei der Modern Quilting Guild Munich gemeldet in der Hoffnung, dass wenn ich Ende Mai wieder nach Deutschland ziehe, Kontakt zu anderen Quilterinnen finde. Ich hoffe, dass sich vielleicht andere Naeherinnen auch fuers Quilten begeistern koennen, ich habe mittlerweile eine neue Decke fuer mein Sofa begonnen. =D

DSC04764

The Rachel Wrap Dress – The grey edition

Follow my blog with Bloglovin

I don’t know about you, but I cannot wait until winter is finally over. I am more than ready to store away my down coat, my boots and my gloves! The only good thing about winter is the fact, that you can wear lovely, long sleeved jersey dresses.

dsc04650-1


When I first started sewing, I read many stories about how difficult it was to sew with jersey, how shifty the fabric was and that you needed a special ballpoint needle or even better, a serger. I was intimidated and stayed clear of said fabric until last year, when I was gifted a serger for Christmas, by my Mister and my lovely mum. Needless to say, all those horror stories were complete and utter rubbish! Jersey is such an easy fabric to work with and most garments can be sewn up in a matter of hours.

I discovered the Maria Denmark Rachel Wrap Dress last summer, I was looking for a beginner friendly pattern, and after reading many reviews I decided to give it a try and was very, very impressed. The entire pattern consists of 4 pattern pieces, you have to add a seam allowance, Maria does tell you how to do this and you have to make your own ties, by using the neckband, which sounds much more tedious than it actually is.

dsc04655-2

I chose this fantastic Premium Jersey from Minerva Crafts in Charcoal, which is not quite as thick as Ponte Roma but definitely thicker than normal weight jersey. The fabric has a great drape to it and is soft and best of all doesn’t pill even after I’ve washed it 5 times!!! For this version, I lengthened the shoulder by 1 inch and graded the arm cycle accordingly. For the ties, I just used the pattern piece for the neckband and lengthened it by 5 inches. As the jersey has the same color on both sides and has a nice weight I didn’t bother using any interfacing, so far neither the neck band nor the ties have stretched out. I did sew some clear elastic band into the shoulder seam to stabilize it, something I always do when I sew with knits. I sewed the dress on my sewing machine using a narrow zigzag stitch that looks more like a thunderbolt and finished all the seams on my serger. Easy Peasy!

dsc04652-11.jpg

The dress turned out exactly as I wanted it to turn out and I love wearing it with my brown boots. As I doubt spring will make an appearance anytime soon, so hopefully I can enjoy wearing it for a few more weeks.

Do you guys have any favorite wrap dress patterns?

My Valentine’s Day Dress – The Vintage Shirtdress

Follow my blog with Bloglovin

Happy Valentine’s Day everyone and welcome to my brand new blog!  =D

Now to be fair, I don’t usually celebrate Valentine’s Day, the Mister thinks it’s a silly capitalistic invention to sell sappy cards, chocolates and flowers… he might be right.. but this girl actually likes chocolates, sappy cards and flowers! So this year we went for a meal (we actually went on Saturday, as the Mister had to fly back to Germany on Sunday – BOOO! for long distance relationships!) and I thought this would be a fantastic occasion for a new dress!

If you’ve been following me on IG for the past few years, you know how much I love The Vintage Shirtdress by Sewoverit. The pattern has a wonderful notched collar, cuffed elbow length sleeves, super swishy skirt and looks lovely in any fabric.

blog1

I chose this poly-cotton heart fabric from Adam Ross, which has been in my stash since last year, when I and my good pal Victoria visited their premises in Birmingham. I marveled at their unbelievable stock, it’s like IKEA for fabrics, I kid you not! They have a wonderful selection of fabrics (check out their viscose section, it’s to die for) and a very lovely team running the enterprise (hello Jas!), so check them out!blog2

Coming back to the pattern, I cut out a size 8, going by the finished measurements and using a 1 cm seam allowance instead of a 1.5 cm seam allowance, to be very honest, I should have sized up, which I will, if I make another sleeveless version in summer. I lengthened the bodice by 1 inch which is a pretty standard adjustment I make on all my garments and I also lengthened the skirt by 1 inch because my last version was a bit short. I serged all the raw seams, because I love it, when the insides are as pretty as the outsides.dsc04606-1

I even made self-covered buttons for the first time in my life – they are not perfect, but I still think they are rather cute. I kept some scrap fabric, so I might actually redo the buttons in the future…or not. I did sew in a tiny snap between the first and second button, to ensure that there would be no “wardrobe malfunction”(!!!), which worked out really well.

dsc04611-1

So if you haven’t tried this pattern …DO IT! I cannot recommend it enough. All in all this dress is a winner – did you guys sew anything for Valentine’s Day?

PS: If any of you know how to change the font color into white, please let me know… I knowthe text is bleeding into the picture… I just have no idea how to change it!